What you’ll take away
- Megapixel count describes sampling, not the whole photographic result.
- Multi-frame processing depends on alignment, motion and useful captured information.
- Optical framing, digital cropping and reconstruction are different zoom mechanisms.
- Compare the scenes and workflows you use, with original files and clear conditions.
The picture is made after the light arrives
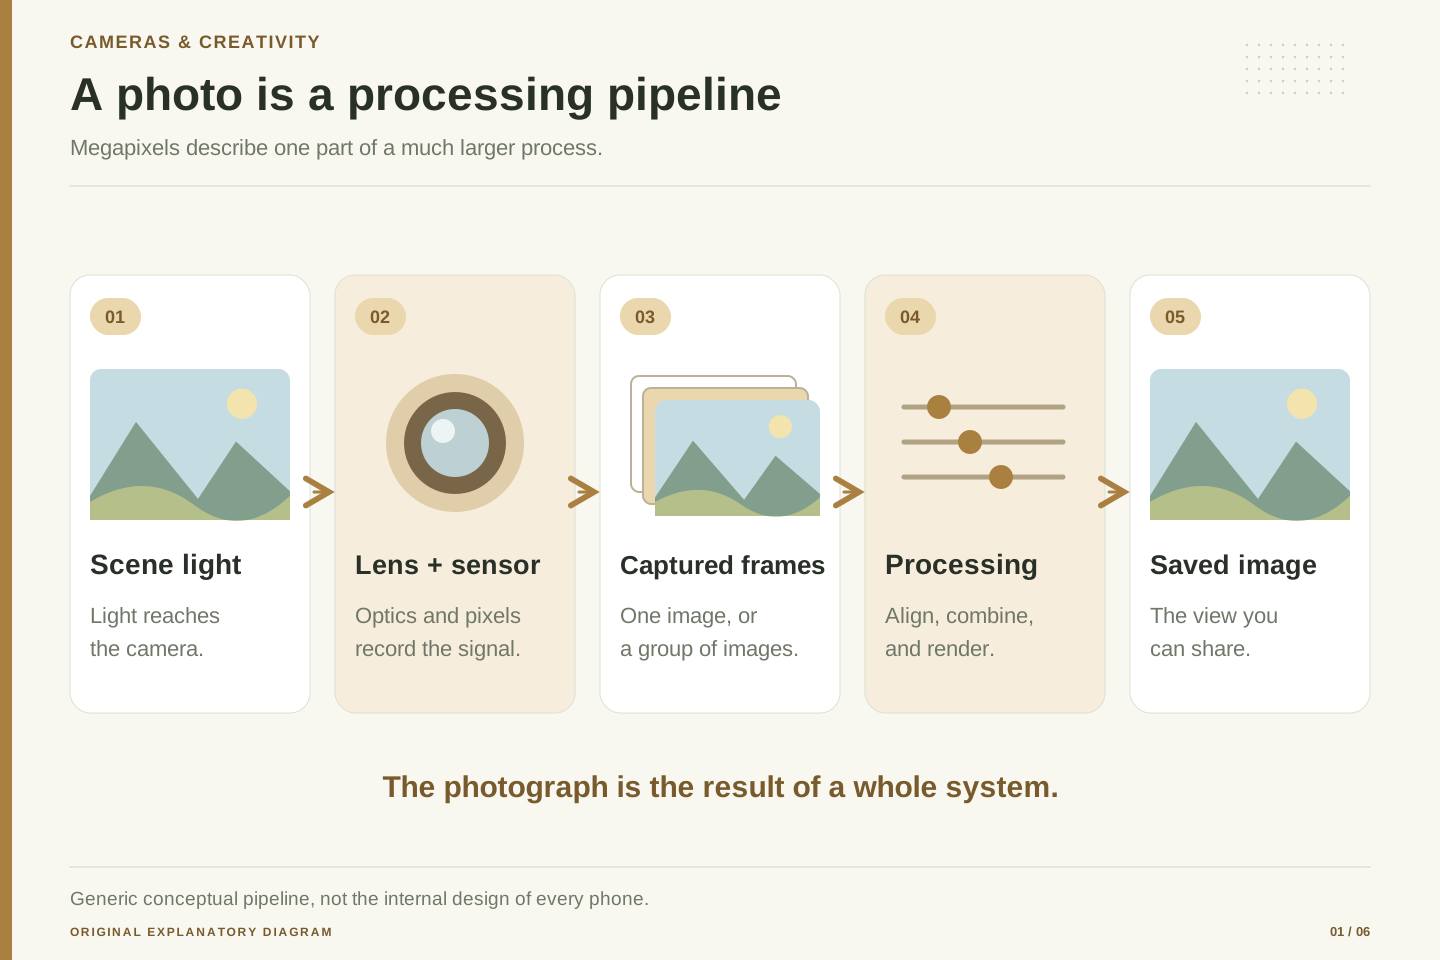
Press the shutter on a phone and a picture appears almost immediately. Between those two moments, the camera has done much more than save a tiny copy of the scene. Light has passed through a lens, reached a sensor, and become data. Software then decides how to turn that data into the image you see. Android's camera documentation describes a pipeline with controls for capture and processing, including exposure, focus and noise reduction. [1]
Computational photography is a broad name for using computation as part of making a photograph. It can include combining frames, adjusting brightness, reducing noise or estimating which parts of a scene belong in the foreground. The exact design differs between devices and modes. This article uses published systems to explain ideas, not to claim that every current phone works in the same way.
Understanding the process makes camera choices less mysterious. A higher megapixel number can be useful, but it does not tell you whether a moving pet will look sharp or a bright window will keep its detail. Those results depend on the light, optics, sensor, exposure choices and processing together. The right question is what the whole camera does in the situations you photograph, rather than which single specification looks most impressive.
Treat a smartphone camera as a capture-and-reconstruction system. The optical image becomes sensor measurements, and those measurements pass through device-specific processing before a display-ready file is produced. Android's HAL documentation exposes this separation through capture requests, image buffers and result metadata; it also describes controls associated with exposure, focus and post-processing. [1]
The diagram here is conceptual, not a universal sequence of independent boxes. Some operations are coupled, repeated or implemented differently across hardware. Multi-frame methods can merge information before conventional single-frame processing would finish, and the preview need not use exactly the same path as the saved photograph.
For evaluation, distinguish the information acquired from the rendering chosen. Exposure and optics constrain the measurements. Denoising, reconstruction, color treatment and sharpening influence how those measurements appear. A visually pleasing result is a legitimate consumer goal, but it is not identical to preservation of every small scene detail.
This distinction also prevents a common testing error: attributing an entire difference to sensor resolution when two phones chose different exposures, fields of view or processing modes. The article explains mechanisms documented in primary research and platform guidance. It does not rank devices, report an unperformed test, or assume an older published implementation describes every feature of a current model.
Megapixels count samples, not photographic success
A megapixel is one million picture elements. For an easy arithmetic example, an image that is 4,000 pixels wide and 3,000 pixels high contains 12 million pixels. Doubling both dimensions produces four times as many pixels, not twice as many. That can create a larger file and more room for cropping, but a file's dimensions do not prove that every extra pixel contains newly captured detail.
The camera also needs enough useful light and a clear optical image. If the subject moves during the exposure, more pixels may describe the blur more finely. If the lens cannot resolve a small pattern, enlarging the saved image does not restore the missing pattern. Research on mobile imaging discusses the constraints created by small optics and sensors, and the role of combining measurements to improve results. [2,4]
Use resolution as one question in a larger comparison. Will you crop heavily, print large, or mostly view pictures on a phone? Do you photograph still objects in daylight or moving people indoors? A high-resolution mode may be valuable for one job without being the best choice for another. Look at the actual output and the conditions, not only the number printed beside the camera.
Separate output raster dimensions from resolved spatial information. A hypothetical 4,000 × 3,000 image has 12 million output samples. Resampling it to 8,000 × 6,000 creates 48 million samples, but interpolation alone does not add independent measurements of the scene. Conversely, a genuinely different acquisition method may provide extra information that an appropriate reconstruction can use.
Image quality also depends on signal and noise. Android's capture-result reference includes a sensor noise model with signal-dependent and signal-independent terms. That is a reminder that noise is not merely a decorative grain filter applied after capture. [8] How visible it becomes also depends on subsequent processing and the scale at which the output is viewed.
Avoid comparing only crops shown at each file's native pixel scale. The same physical feature occupies different numbers of pixels in different files, so such crops can exaggerate or disguise practical differences. Include a comparison at the same displayed size and field of view, then inspect native detail separately.
A useful resolution claim states what is being resolved, under what lighting, with what motion and what output processing. This is an original evaluation framework: it does not imply that megapixels are irrelevant. It means pixel count should be interpreted alongside the acquisition conditions that determine whether those pixels contain useful distinctions.
Why several imperfect frames can make one better photo
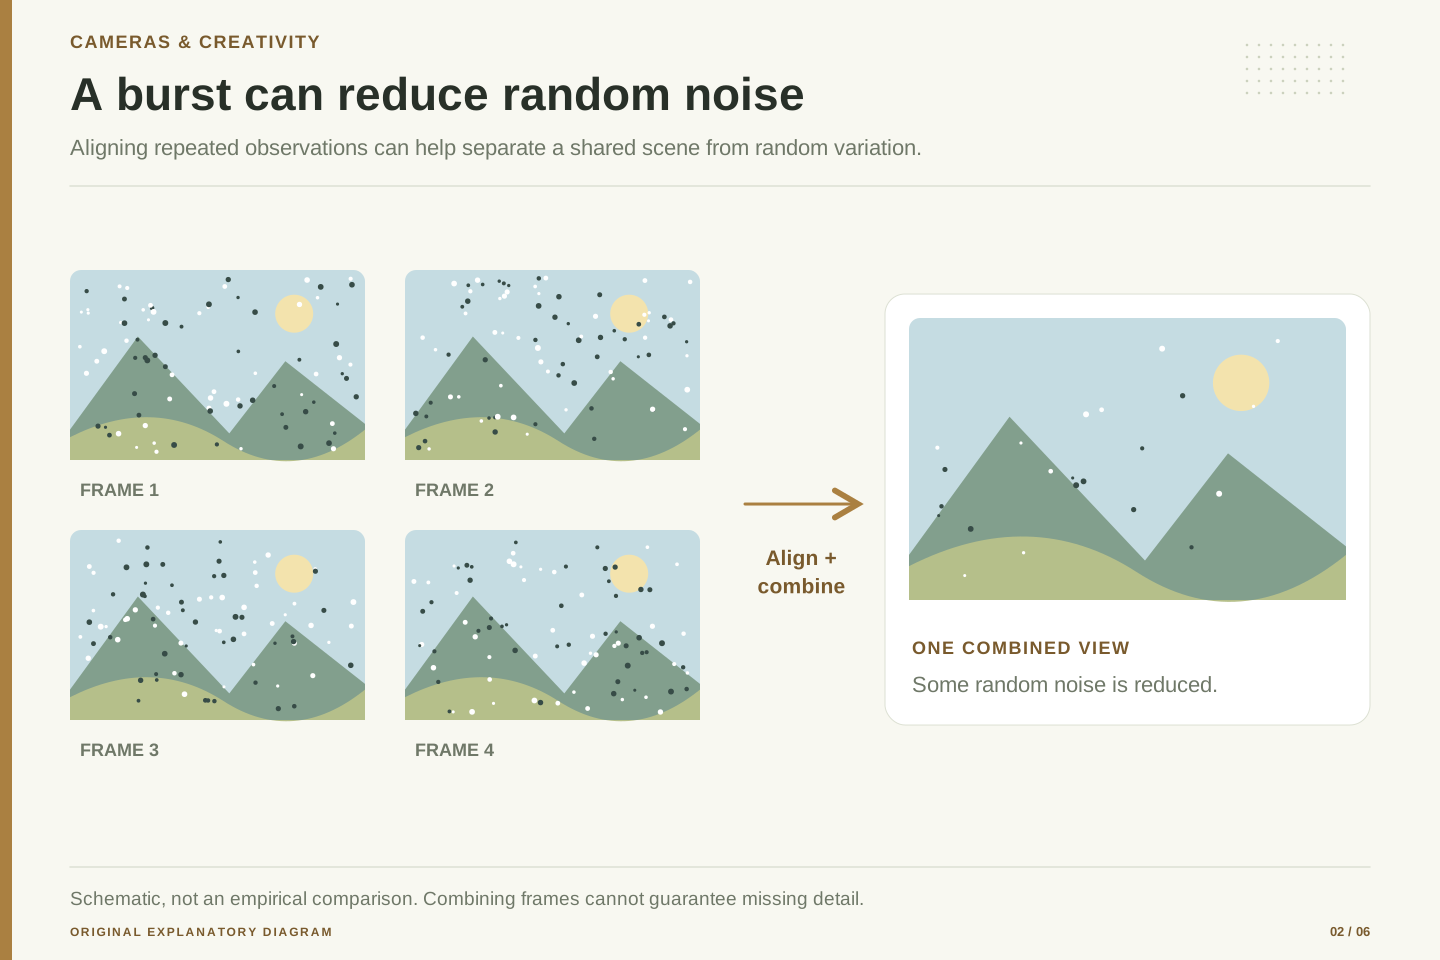
A single dim photograph may contain random-looking speckles. If a camera captures several views of the same scene, it can try to line them up and combine information. Google's published HDR+ research describes capturing, aligning and merging a burst to reduce noise and improve the range of brightness the result can represent. [2]
Imagine drawing the same shape on several transparent sheets, with a few accidental marks in different places on each sheet. If you line up the shapes, the repeated structure is easier to distinguish from the marks that change. This is only an analogy: a real camera has to handle sensor measurements, motion and uncertainty. It cannot simply place photographs on top of one another and assume they agree.
A moving hand, leaf or face makes the job harder. One frame may show an object in a different place, or reveal part of the background that another frame hides. The camera has to decide which information can be combined. That is why more frames do not guarantee a better result in every scene. For your own pictures, wait until the camera signals that capture has finished. The button press may start or complete only part of a multi-frame operation, depending on the mode.
Multi-frame processing can exploit repeated observations of a scene, but its benefit depends on registration and a suitable noise model. The original HDR+ paper used aligned raw bursts and deliberately protected highlights while combining information. That is a specific published design, not a statement that all burst pipelines use the same exposure strategy. [2]
As a mathematical illustration, averaging N independent, equal-variance noisy measurements of an unchanged signal reduces the noise variance of the mean by a factor of N. Four such measurements halve the standard deviation. The independence, alignment and equal-signal assumptions matter; this is not a promise that four phone frames produce a particular visible improvement.
An image is not a single stationary measurement. Objects move, the camera shifts, foreground surfaces reveal and hide background regions, and individual frames can blur differently. A robust merge must avoid treating incompatible observations as if they were repeated measurements of the same scene point. The resulting artifacts may appear as doubled edges, inconsistent texture or unnatural local detail.
When evaluating a burst feature, include both static and moving regions in the same frame. Inspect whether a cleaner wall accompanies a worse hand or face. A single noise metric cannot describe that tradeoff. Good performance requires useful noise reduction without silently replacing the scene's structure with a plausible but unsupported pattern.
HDR handles a bright window and a dim room
A room with a bright window is difficult because the scene contains a wide range of brightness. An exposure that preserves the view outside may leave the room dark. An exposure that brightens the room may lose detail in the window. HDR methods aim to handle this kind of range, although different cameras use different capture and processing strategies.
One approach combines exposures chosen for different parts of the scene. Google's explanation of HDR+ with bracketing describes adding differently exposed frames while dealing with motion during merging. Its earlier system used a different strategy based on a burst of short exposures. [3] The shared goal does not imply identical methods.
After capture, the image still needs to be rendered for viewing. Brightening a dark area can make it easier to see, but too much adjustment can make the scene look flat or unnatural. Look for both preserved information and believable relationships between light and dark. When comparing modes, choose a scene with a bright area, a dark area and some movement. Ask whether the camera improves the useful detail without producing glowing edges or strange patches. An HDR label alone cannot answer that question for every picture.
Distinguish capture dynamic range from tone rendering. Capturing useful shadow information while avoiding highlight clipping is an acquisition problem. Mapping the resulting values into an output that looks appropriate on a display is a rendering problem. Improving one does not automatically establish that the other is well handled.
Google's bracketing account describes combining shorter and longer exposures and the associated alignment challenge. The older constant-exposure HDR+ strategy protected highlights and used a burst to improve noisy regions; bracketing introduced a different balance. These publications document an evolution of particular systems, not a fixed recipe for all smartphones. [3]
A test scene should expose the tradeoffs. Include a fine highlight pattern, a dark textured surface and a moving edge. Compare whether apparent highlight recovery is supported by captured structure, whether shadow lifting reveals useful detail or amplified artifacts, and whether local tone changes preserve a coherent appearance.
Keep the comparison's output conditions explicit. A file viewed through different apps or display pipelines can look different even when the captured data are unchanged. Do not describe a brighter preview as a measured increase in sensor dynamic range. For an editorial review, preserve original files and explain the viewing setup. The diagrams here demonstrate relationships between exposures and rendering; they are not substitutes for photographs from a controlled test.

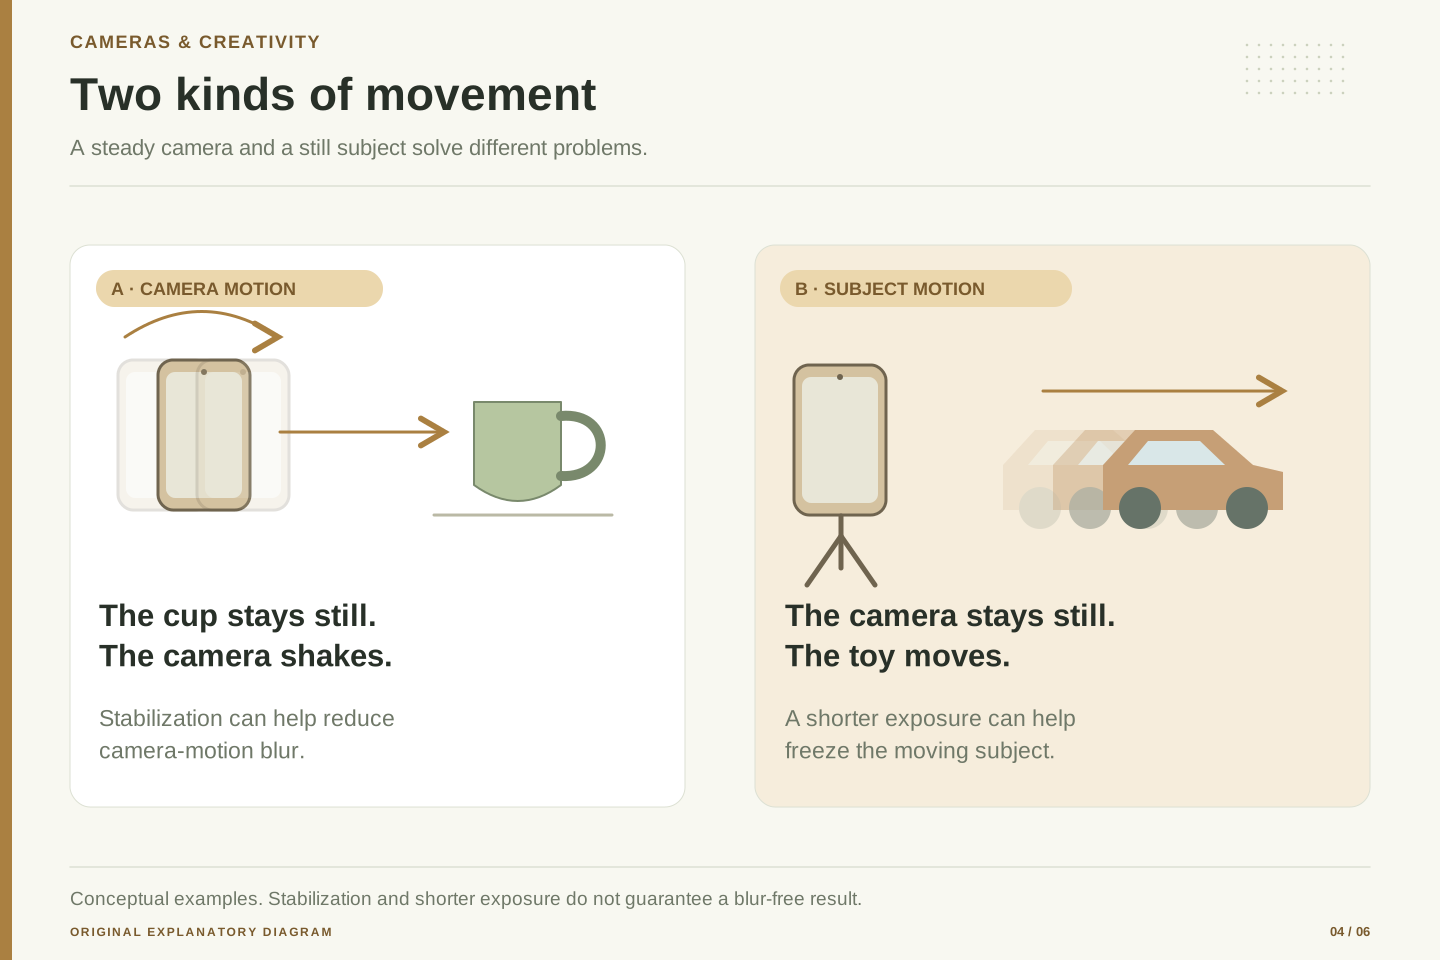
Camera shake and subject movement are different problems
A shaky hand can blur a stationary object. A moving subject can blur even when the phone is perfectly steady. These are different problems. Optical image stabilization can help with some camera movement, but it does not stop a child, pet or vehicle from moving through the scene. Google's Night Sight research explains how exposure choices and motion estimation help balance low-light capture against blur. [5]
Think of photographing a toy car. If the toy is still and your hand wobbles, supporting the phone may help. If the phone is steady and the toy rolls past, the camera needs a capture strategy suited to that movement. A longer exposure gathers light for longer, but it also gives the moving toy more time to change position during a frame.
This is why a night mode that produces an impressive picture of a building may behave differently at a lively family gathering. Try the normal camera mode as well as night mode when subjects move. Seek better available light when practical and safe, and avoid assuming that the most dramatic mode is always the right one. Judge the subject you care about: a beautifully clean background is not much help if the important face is blurred.
Separate global camera motion, local object motion and focus error. They can produce superficially similar loss of detail but call for different remedies. Stabilization addresses certain components of camera movement; it does not freeze independent motion within the scene. Published Night Sight work describes motion-aware exposure selection as part of the response to this constraint. [5]
For a controlled comparison, keep a static reference object beside a moving object. If both smear similarly, camera movement or broader capture behavior may be involved. If only the moving object smears, subject motion is the more direct clue. This is a diagnostic starting point, not a complete forensic method; focus and processing can introduce additional differences.
Exposure duration, total burst duration and shutter responsiveness should be reported separately. A burst may use short individual frames while taking longer overall to acquire and process. An output can therefore preserve a sharp moving region while still imposing a noticeable delay before the next shot. One speed label does not describe all three experiences.
For everyday evaluation, test the scene the reader actually encounters: a moving hand indoors, a pet turning its head or leaves in a night breeze. Record the selected mode and keep repeated attempts, including failures. Selecting only the best frame from one device while using a single attempt from another is not a fair comparison.
Zoom can change optics, crop data, or combine frames
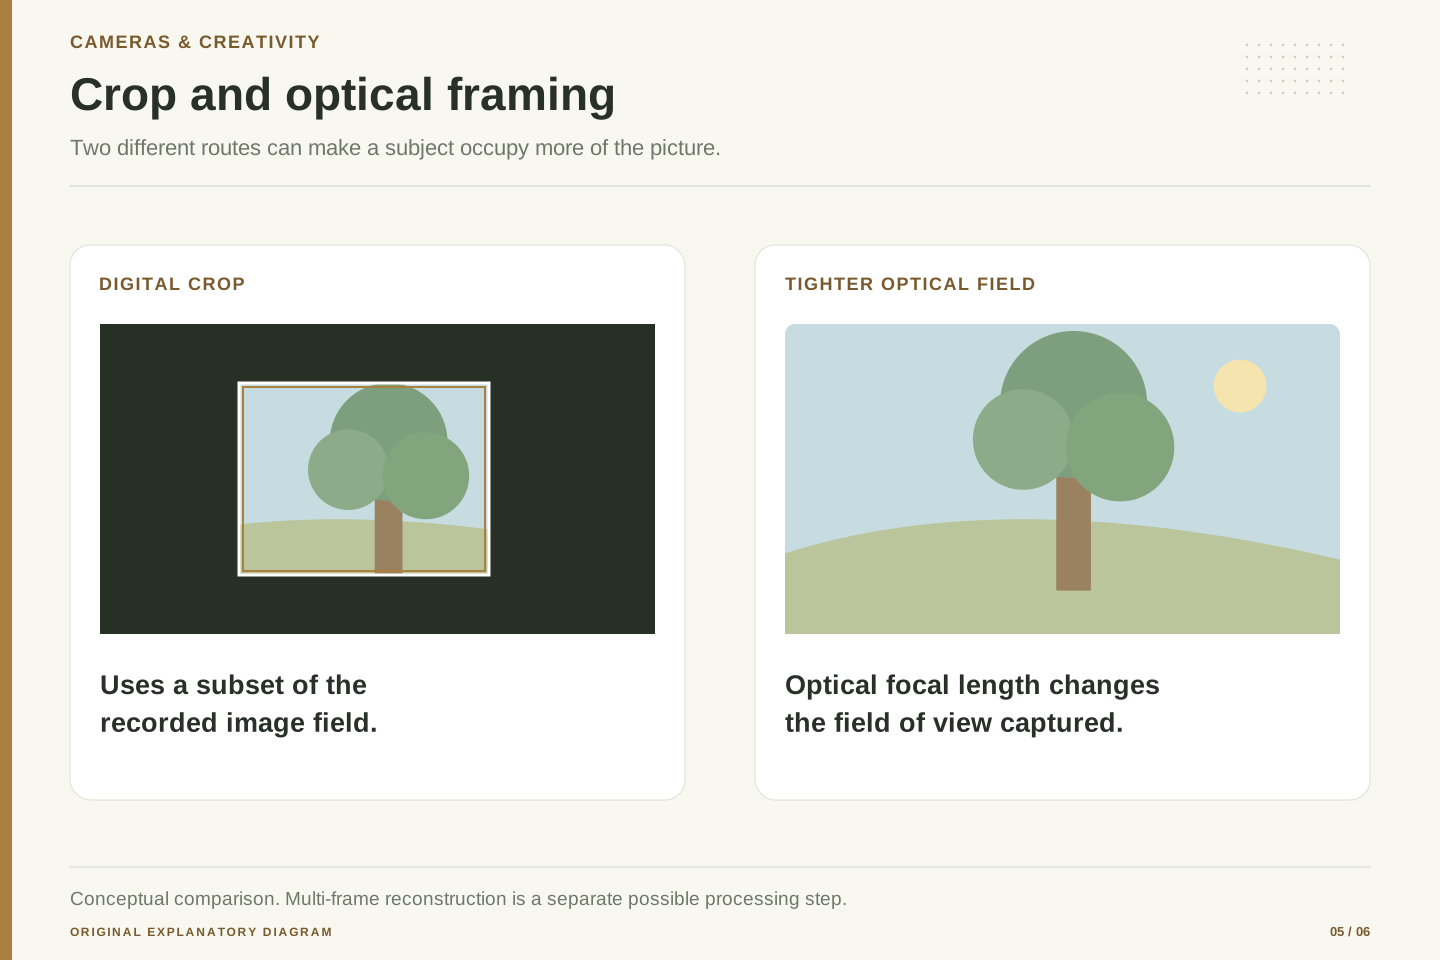
The word zoom can describe several different operations. A longer focal-length camera changes how the scene is framed optically. A digital crop keeps a smaller part of an existing view and enlarges it. Software may also combine several frames to improve a zoomed result. Those methods can work together, but they are not the same thing.
Google's multi-frame super-resolution research describes using small differences between raw frames to reconstruct an image. [4] That is more involved than simply enlarging one file. It still has to work with the information captured and with the challenges of movement. A zoom label should not be read as a promise that any distant detail can be recovered accurately.
For an original at-home comparison, use a stationary printed pattern that you are allowed to photograph. Take pictures at the camera's named focal-length options and at an intermediate setting, keeping the position and light similar. Compare the same part of the scene at the same viewing size. Notice whether fine lines remain distinct or become rough, repeated or painted-looking. Do not use an enhanced photograph to invent certainty about text that was never legible in the captured evidence.
Optical magnification, spatial cropping and computational reconstruction are different mechanisms. Android's capture API documents crop regions used for digital zoom, while Google's super-resolution paper describes merging raw observations with small subpixel offsets. [8,4] Neither description justifies treating every advertised zoom factor as a direct measure of optical resolving power.
A crop reduces the portion of the original field used for the output. Interpolation can restore the desired raster dimensions, but cannot by itself establish new scene measurements. Multi-frame reconstruction can use complementary samples, subject to registration, noise and motion constraints. The practical result must be evaluated rather than inferred from the final dimensions.
A fair comparison holds camera position constant when examining framing options, then accounts for the actual field of view in the output. Moving closer changes perspective as well as subject size, so it answers a different question. If you compare a longer focal-length module with a crop from a wider one, report the light level and selected mode rather than assuming the module choice guarantees a winner.
For evidence-sensitive subjects, retain the unedited original and avoid treating a plausible reconstructed character or texture as a confirmed observation. This is an editorial inference from the distinction between measurements and reconstruction. The article's diagram shows those paths separately so readers can ask what a zoom feature actually does.
Portrait blur begins with a decision about boundaries
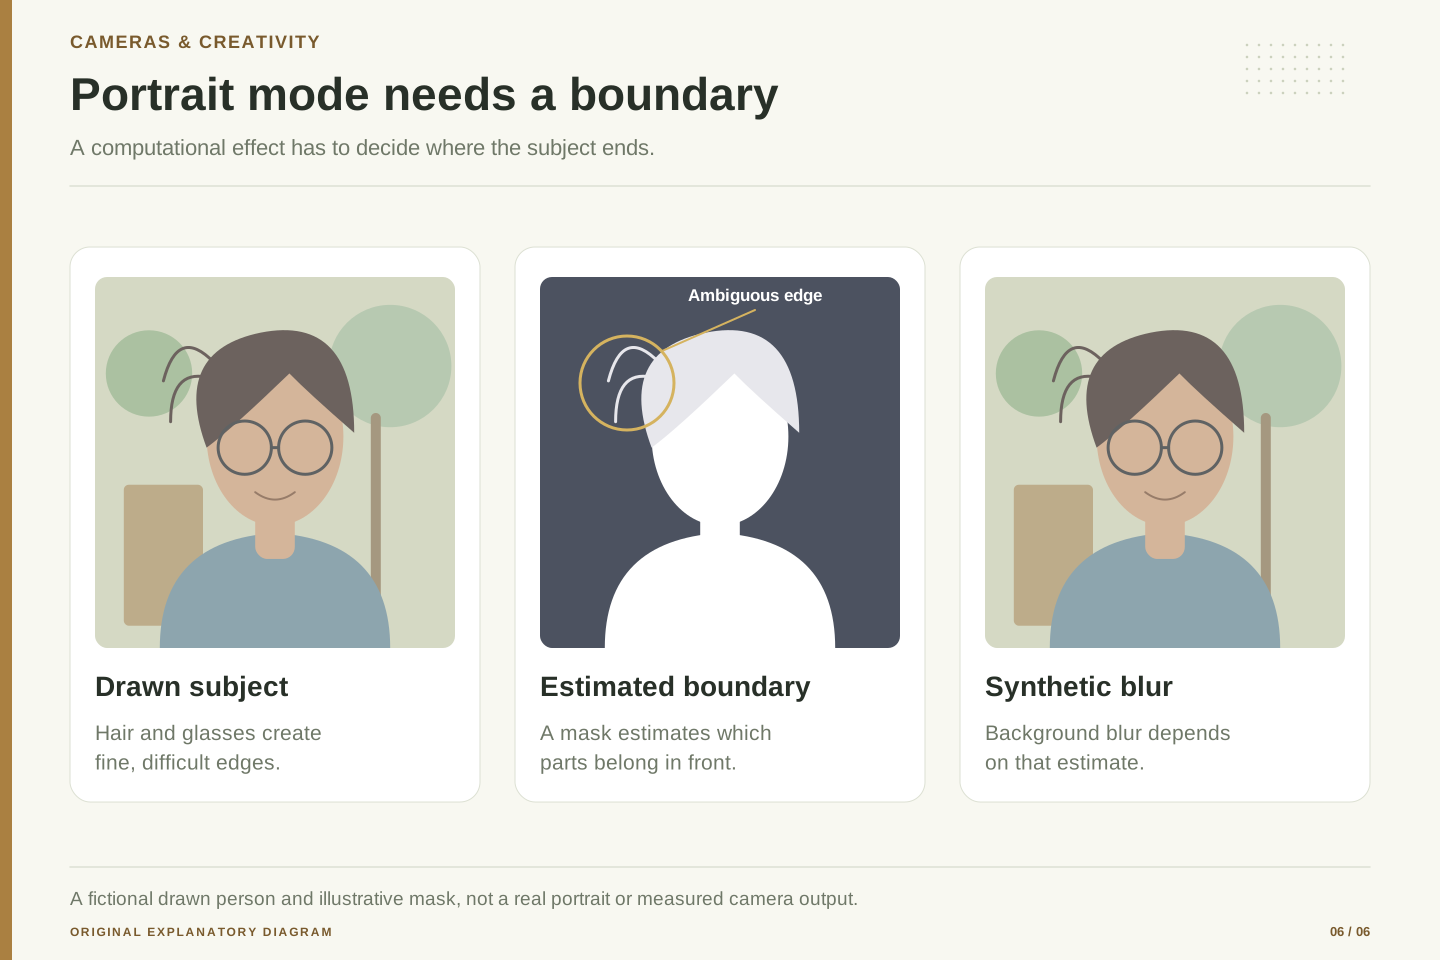
Portrait mode often makes the background softer to draw attention to a person or object. To do that, the software needs some idea of what belongs to the subject and what lies elsewhere. A published Google explanation describes segmentation and depth information used to create synthetic background blur, and distinguishes that effect from optical blur. [6]
Edges reveal the difficulty. Fine hair, transparent glasses, gaps between fingers and objects at similar colors can make the boundary uncertain. The software may blur part of the subject or leave a sharp patch of background. These are useful places to inspect because a small error near a face can matter more than a smooth result across a large empty wall.
For a practical experiment, photograph a consenting adult or a simple household object against two backgrounds, one plain and one busy. Compare the normal image with the portrait effect. Keep the blur moderate while you inspect the edges. The goal is not to declare all synthetic blur false or all optical blur superior. It is to choose an effect that supports the picture and to recognize where the software has made a decision that you may want to change.
Synthetic shallow depth of field requires an estimate of scene structure. A foreground mask identifies which image regions belong to a subject; a depth estimate provides additional information about relative distance. Google's documented portrait implementation used these ideas in specific combinations and explicitly distinguished synthetic defocus from optical defocus. [6]
The distinction matters at occlusions and transparent or finely structured regions. A binary mask cannot fully describe every partially covered background pixel. Even a richer depth estimate can be uncertain around hair, glass and thin structures. Rendering stronger blur can make those uncertainties more visible, because an incorrect boundary separates regions with very different appearances.
Evaluate the mask and the final effect conceptually as separate tasks. A correct subject outline does not guarantee a natural depth transition, and an attractive background can hide a damaged edge. Use a repeatable object arrangement with overlapping surfaces at different distances, then inspect both foreground and background treatment.
For a reader-facing review, describe visible behavior rather than assigning an undocumented internal cause. If a phone leaves a sharp halo, report that observation under the tested conditions; do not claim to know which neural network layer failed. The current diagrams are original illustrations of boundary uncertainty, not examples captured from a commercial device or a real person's photograph.
RAW gives editing room, not a promise of zero processing
A ready-to-share photo and a RAW file serve different purposes. The ready-to-share version contains many choices about appearance. A RAW-oriented workflow can give you more control when editing, but the word raw does not mean every format contains untouched sensor data. Apple's ProRAW documentation explicitly describes combining RAW information with iPhone image processing. [7]
If you enjoy adjusting exposure, color and white balance, that extra flexibility may be useful. If you mainly want quick family pictures, a larger editing file may create work you do not need. Choose the workflow for the job rather than assuming the more technical label always produces the better final photograph. An unedited file can look less polished because you have not yet made the rendering choices that the normal camera makes for you.
For a fair comparison, save the original and an exported edit, and note which app made the edit. Compare a sensible edit against the normal output, not an unfinished file against a finished one. Also check storage and sharing requirements before making a high-volume RAW habit. The purpose is control over the result, not collecting the largest possible files or using a format name as a shortcut for image quality.
RAW is a workflow category whose exact representation and processing history need to be identified. Apple states that ProRAW combines standard RAW information with its image processing and uses DNG. It should therefore not be described as a universal synonym for an unprocessed sensor mosaic. [7]
For evaluation, record the capture mode, file format, development application, profile and export settings. A difference between two rendered images can come from the converter's defaults rather than a difference in captured scene information. Keep the original file available so the edit can be revised instead of repeatedly modifying an already rendered output.
Separate latitude from accuracy. Greater editing flexibility can make it easier to adjust appearance, but does not establish that an aggressively lifted shadow contains reliable fine detail. Nor does a RAW file recover a subject that moved out of the exposure or repair focus that missed the intended plane. The capture constraints still apply.
A useful comparison publishes both the intended workflow and its cost: editing time, storage, compatibility and the desired output. This is a proposed review method, not a claim that one format is always superior. For a blog explaining technology, the strongest conclusion is conditional: choose a RAW-oriented workflow when its available controls solve a real editing need, and assess the final result alongside the simpler default capture.
A better camera comparison starts with a better question
Before comparing phones, decide what success looks like for your photographs. A reader who photographs documents needs legible text and consistent focus. Someone who photographs children playing may care more about motion and timing. A person who edits landscapes may value highlight detail and editing flexibility. These are different jobs, so a single overall winner can hide the tradeoffs that matter most.
Build a small scene set: a bright window beside a dim room, a still object in low light, a moving object indoors, fine detail at a distance, and a portrait-style subject with difficult edges. Keep lighting and position as consistent as you can. Compare normal viewing sizes first, then inspect details. Save failures as well as successes, and note the camera mode. This is an original testing suggestion; no results from such a test are claimed here.
The lesson of computational photography is not that software replaces light or that specifications are useless. The final photograph reflects both the measurements the camera captured and the decisions made afterward. Learn to recognize those decisions, and you can choose modes more thoughtfully, read reviews more critically, and explain why two photographs of the same scene can differ even when their megapixel counts match.
Define the intended use before selecting metrics. Document capture, moving subjects, low-light static scenes and heavily edited landscapes stress different parts of the imaging system. A test should expose the relevant failure modes rather than allow one visually striking scene to stand in for all photographic work.
Use matched framing and controlled output sizes, record capture settings where available, and retain original files. Repeat scenes to reveal variability. Avoid cherry-picking one device's best result against another's first attempt. If the comparison is subjective, state the preference criterion; if it is quantitative, state the method, units and uncertainty. An aesthetic judgment should not be presented as a sensor measurement.
Inspect interactions. Strong denoising may smooth texture; aggressive sharpening may emphasize boundaries without recovering missing information; a portrait effect may improve emphasis while damaging a fine edge. Report the useful tradeoff in the actual scene instead of treating every processing step as either automatically beneficial or inherently dishonest.
A technically careful review links claims to evidence and distinguishes generic mechanisms from product-specific observations. This article provides the mechanisms and a proposed evaluation approach. Its diagrams are explanatory, and the cited publications document particular systems at their stated dates. Any claim about a current phone's performance still requires current specifications or a transparent, repeatable test of that phone.
Sources & further reading
Explore the references behind this guide. External pages may change after our review.
- Camera HAL and camera operation modelAndroid Open Source Project · Accessed 6 Nov 2026
- Burst photography for high dynamic range and low-light imaging on mobile camerasHasinoff et al.; Google Research / SIGGRAPH Asia 2016 · Accessed 6 Nov 2026
- HDR+ with Bracketing on Pixel PhonesGoogle Research · Accessed 6 Nov 2026
- Handheld Multi-Frame Super-ResolutionWronski et al.; Google Research / ACM TOG 2019 · Accessed 6 Nov 2026
- Night Sight: Seeing in the Dark on Pixel PhonesGoogle Research · Accessed 6 Nov 2026
- Portrait mode on the Pixel 2 and Pixel 2 XL smartphonesGoogle Research · Accessed 6 Nov 2026
- About Apple ProRAWApple Support · Accessed 6 Nov 2026
- CaptureResult: sensor noise profile and scaler crop regionAndroid Developers · Accessed 6 Nov 2026
Article updated 6 Nov 2026.
Found something we should revisit?
Good explanations get better with thoughtful feedback.