What you’ll take away
- A shadow is a place receiving less light because an object blocks some paths.
- Changing the source, object or screen can change a shadow.
- Earth turns, so outdoor shadow patterns change during the day.
- Use a safe LED torch with a grown-up, record real observations, and never look directly at the Sun.
Meet the shape that follows the light
Your shadow can look tall in the morning and much shorter later. Indoors, a tiny toy can make a huge shape on a wall. Neither you nor the toy has suddenly grown. The light, the object and the place where the shadow falls have changed their arrangement. You can investigate that arrangement like a detective.
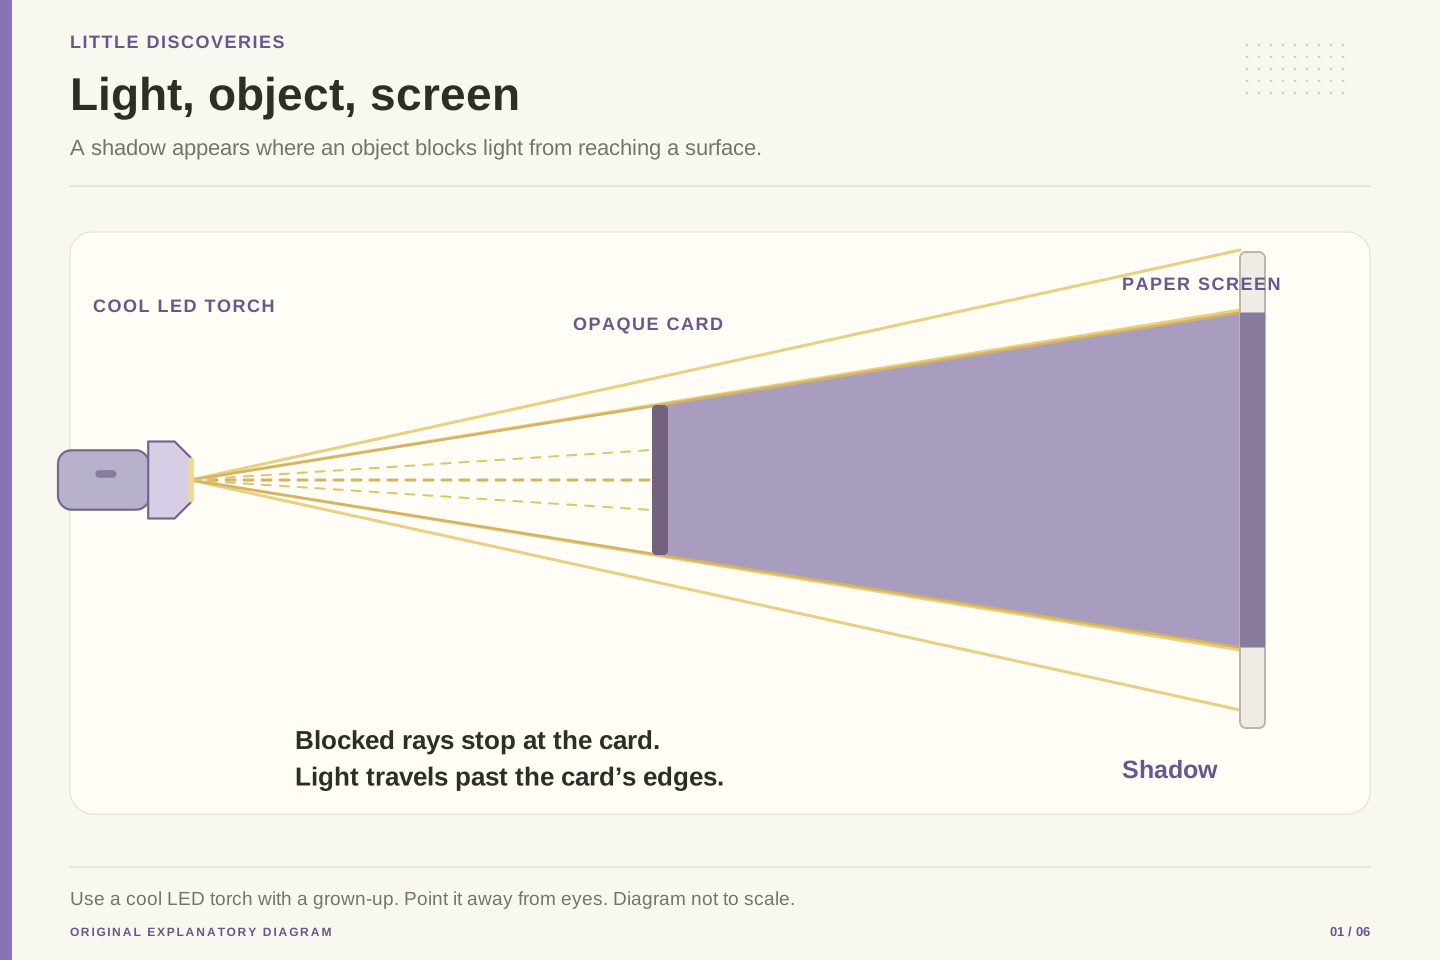
A shadow is a place receiving less light because something is blocking part of the light's path. It is not a dark material that an object sends out. The Institute of Physics explains shadows using the straight paths that light follows through a uniform material such as the air in a simple classroom experiment. [1] A wall or sheet of paper helps us see the darker area clearly.
We will try some small indoor investigations and then think about outdoor shadows. Ask a grown-up to help you choose a clear, safe space. Use a cool LED torch, not a laser or candle, and point it at the paper rather than anyone's eyes. For outdoor observations, look only at shadows on the ground. Never look directly at the Sun; ordinary sunglasses do not make that safe. NASA's solar-viewing guidance explains why special precautions are needed for looking at the Sun, which these activities do not require. [6]
The technical reading mode is for curious older children and adults exploring together. Start with three parts: a light source, an object that blocks some light, and a receiving surface. A shadow is a reduction in illumination relative to the surrounding area. The object does not emit darkness; it changes which paths from the source can reach the surface. [1]
For these activities, use a ray model. A ray is a line drawn to represent a possible direction of light travel. In a uniform medium, straight lines provide a useful approximation for many everyday shadow problems. This is a model with limits, not a claim that light is literally made of pencil-thin lines. OpenStax describes this approach as geometric optics. [7]
Keep the investigation safe and simple: a cool LED torch, a stable toy or opaque card, and a paper screen. No lasers, flames, optical magnifiers or direct solar viewing are needed. Observe outdoor shadows with your attention on the ground; normal sunglasses are not solar-viewing equipment. [6]
The aim is to connect an observation with a testable explanation. Before moving anything, predict what will change. Afterward, describe what actually happened. A prediction that turns out wrong is useful because it shows which part of your explanation needs another look.
Build a tiny shadow stage
Place a sheet of plain paper against a stable support. Set a small toy or a piece of thick card in front of it. Ask a grown-up to hold or support the torch so it shines toward the paper. Leave enough room to move the object without touching the light. You do not need a completely dark room; you only need to see the difference between the lit paper and the shadow.
Find the three parts before you begin. Where is the source? Which object blocks the light? Which surface shows the shadow? Now move the object gently from side to side. Watch how the shadow follows the change. Turn the object a little and notice whether its outline changes. A toy that is wide from one direction may look narrow from another.
Try making a prediction using a sentence such as, I think the shadow will become narrower when I turn this card sideways. Then test it. Keep your first drawing even if the result surprises you. The drawing is a record of your idea, not a score. This little stage is your own experiment: the exact result depends on the torch, object and distances you use, so the diagrams show possibilities rather than measurements we have already made for you.
Make the setup repeatable by marking the torch position, object position and screen position with removable tape on the table. Keep the screen upright and the object stable. A simple shape is easier to measure than a toy with many projections. The marks let you restore the starting arrangement after each trial.
Change one variable at a time. First translate the object sideways while keeping its distance from the source and screen approximately fixed. Next rotate the object without intentionally moving its center. These actions test different questions: translation changes position, while rotation can change the projected outline. If both occur together, it becomes harder to identify the cause of the change you see.
Draw the arrangement from above or from the side and label it. Add arrows showing the direction you moved the object. Do not draw a ray continuing straight through an opaque card as if the card had no effect; show the blocked path ending at the object and the unblocked paths passing its edges.
This is an original classroom investigation using the ray model, not a reproduction of measured data. Its value comes from recording enough detail for another person to repeat your setup. A beautiful drawing without positions or labels is less useful scientifically than a simple sketch that explains exactly what was changed.
Make a little object cast a big shadow
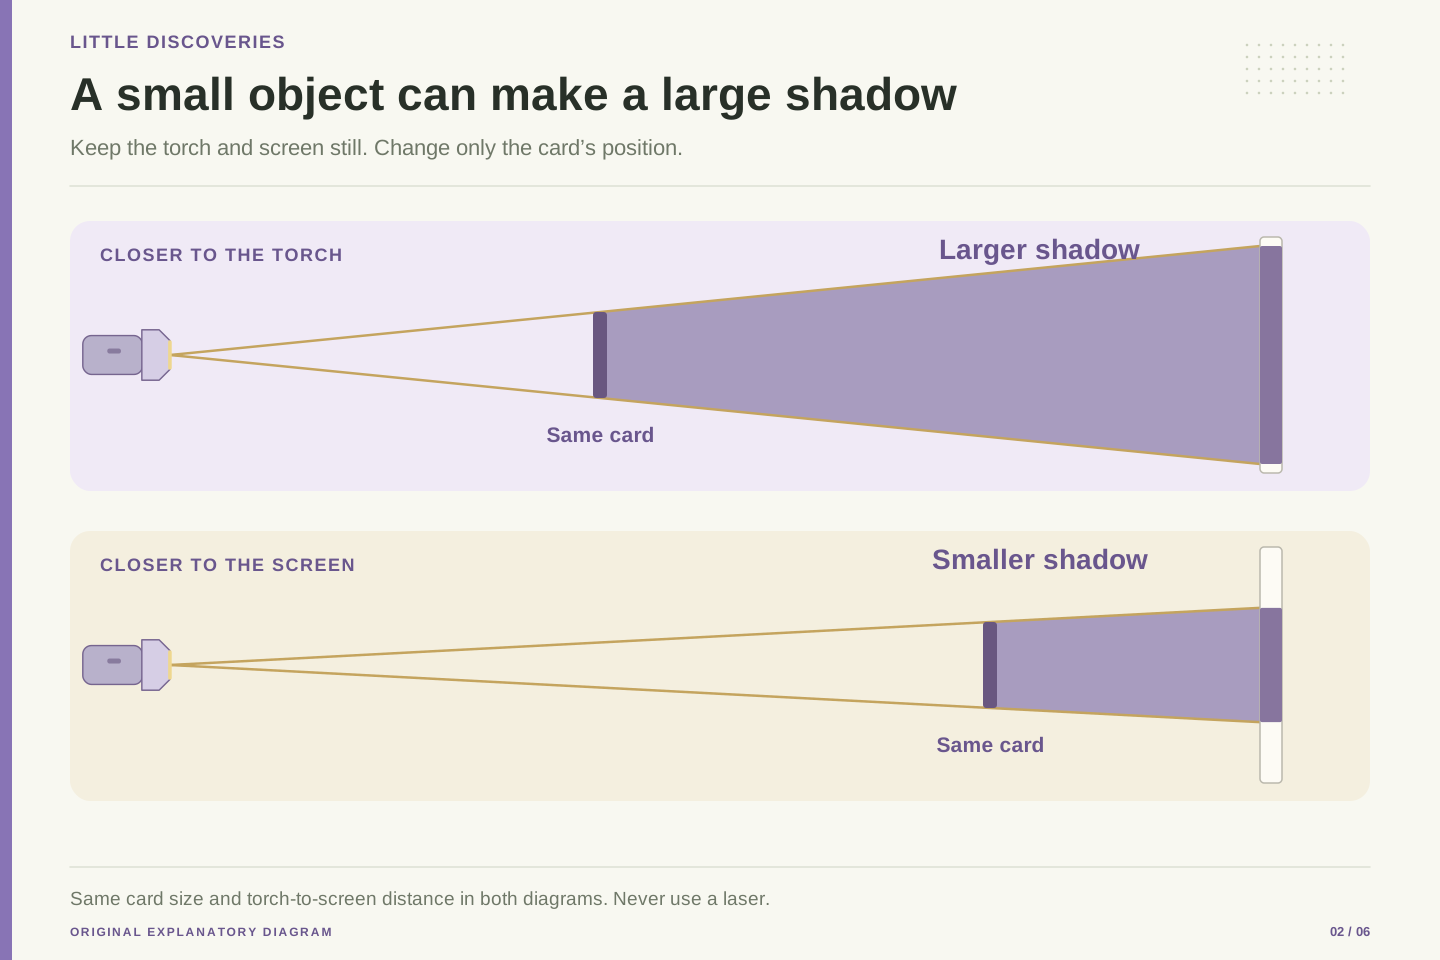
Keep the torch and paper in their places. Start with the object fairly close to the paper. Look at the shadow's size. Now move the same object toward the torch, keeping it between the light and the paper. In this simple arrangement, its shadow usually becomes larger. The object has not grown; it blocks paths that spread across a larger part of the screen.
Try the opposite movement. Bring the object closer to the paper again. The shadow becomes closer in size to the object. Draw both arrangements with the same toy in each picture. Use lines from the light past the object's edges to the paper. Those lines help explain why the outline changes. The ray model is useful for working out this geometry. [7]
Make the activity into a matching challenge. Draw a large circle on one part of the paper and a smaller circle on another. Can you move a round object so its shadow roughly matches each circle without changing the torch position? You may need a little trial and error. If the edges are fuzzy, agree on how you will judge the match. A fuzzy edge is something to investigate later, not a reason to pretend your measurement is perfect.
For an ideal point source and a flat object parallel to a flat screen, similar triangles predict the shadow's scale. Let d be the distance from the source to the object, and D the distance from the source to the screen. The shadow-to-object size ratio is D divided by d. This is a geometric derivation using the ray model, with the source and screen fixed. [7]
For an invented example, place a 4 cm tall card 20 cm from the ideal source and a screen 60 cm from it. The ratio is 60/20 = 3, giving a predicted shadow height of 12 cm. Move the card to 30 cm from the source, and the ideal prediction becomes 8 cm. These are calculated examples, not results from a real torch experiment.
A real LED torch has a source with size and may contain optics that shape its beam. The object may tilt, and the screen may not remain parallel. Those details explain why your measurements need not match the simple calculation exactly. Describe the model's assumptions before deciding that a difference means someone made a mistake.
Keep the distinction between source-to-object distance and object-to-screen distance clear. Swapping them changes the calculation. Label the actual positions on your sketch so another reader can see which distance each number represents.
Low light stretches a shadow across the ground
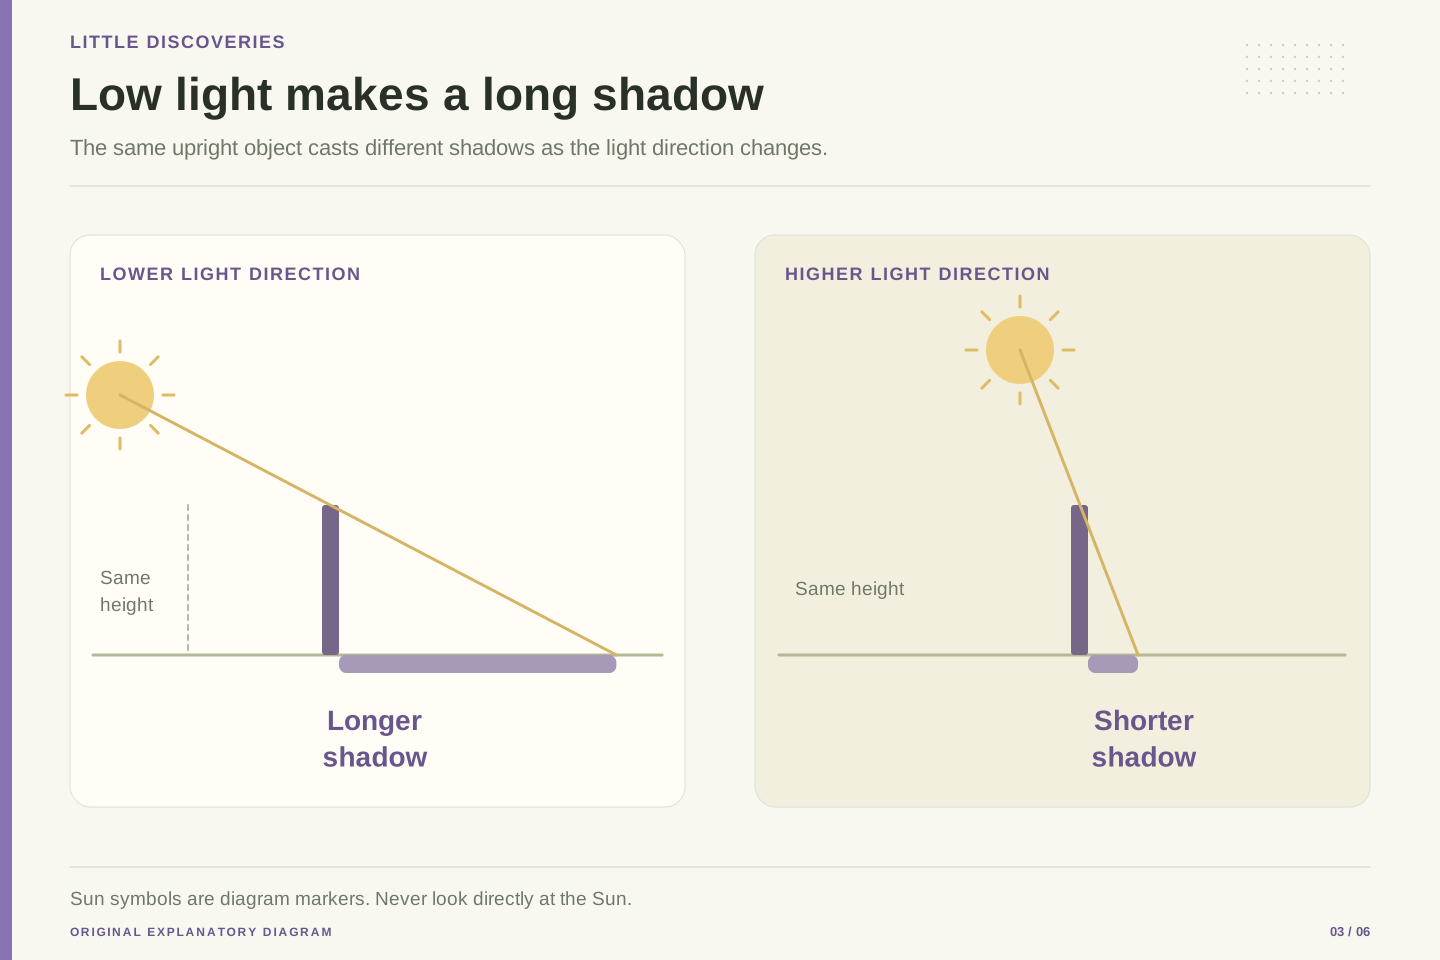
Stand a small block upright on a flat surface. Keep the block in place and shine the torch from one side at a low angle. Its shadow stretches away from the light. Raise the torch so the light arrives more steeply, still pointing at the block and surface rather than your eyes. The shadow becomes shorter in this arrangement.
Outdoor shadows follow a related pattern. When the Sun is low in the sky, an upright object on level ground can cast a long shadow. When the Sun is higher, its shadow is shorter. NASA's discussion of tropical shadows shows how the Sun's position can even make some upright objects cast a very small shadow near solar noon in particular places and seasons. [3]
Notice the careful words: upright object, level ground, and particular places. A sloping path or a bent object can change the shape you see. The Sun is not directly overhead everywhere at lunchtime. Make your own prediction before moving the torch, then explain the result using the direction of the light. You can learn about the pattern by looking at the shadow; you never need to look toward the outdoor Sun to do this investigation.
For a vertical object of height h on horizontal ground, with approximately parallel incoming rays at an elevation angle alpha above the ground, the ideal shadow length is h divided by tan(alpha). This follows from the right triangle formed by the object, ground and ray through the object's top. It is a mathematical model, not an instruction to measure the Sun by looking at it.
At 45 degrees, tan(alpha) is one, so the ideal shadow length equals the object's height. At a lower positive angle, the shadow is longer; at a higher angle, it is shorter. Use a drawn triangle or an indoor model to explore these relationships safely. A nearby torch has diverging rays, so its geometry is not identical to distant sunlight unless the approximation is adequate for the setup.
NASA's tropical-shadow explanation provides a useful reminder that solar geometry depends on place and season. Near-zero noon shadows occur under specific conditions rather than everywhere every day. [3] A general classroom rule should not erase that variation.
If measurements disagree with a prediction, check whether the object is vertical, the surface is level and the shadow endpoint is clearly defined. Record those limits. The point of the formula is to connect geometry to an observation, not to make every outdoor surface behave like a perfect textbook diagram.
The Earth turns, so the pattern changes through the day
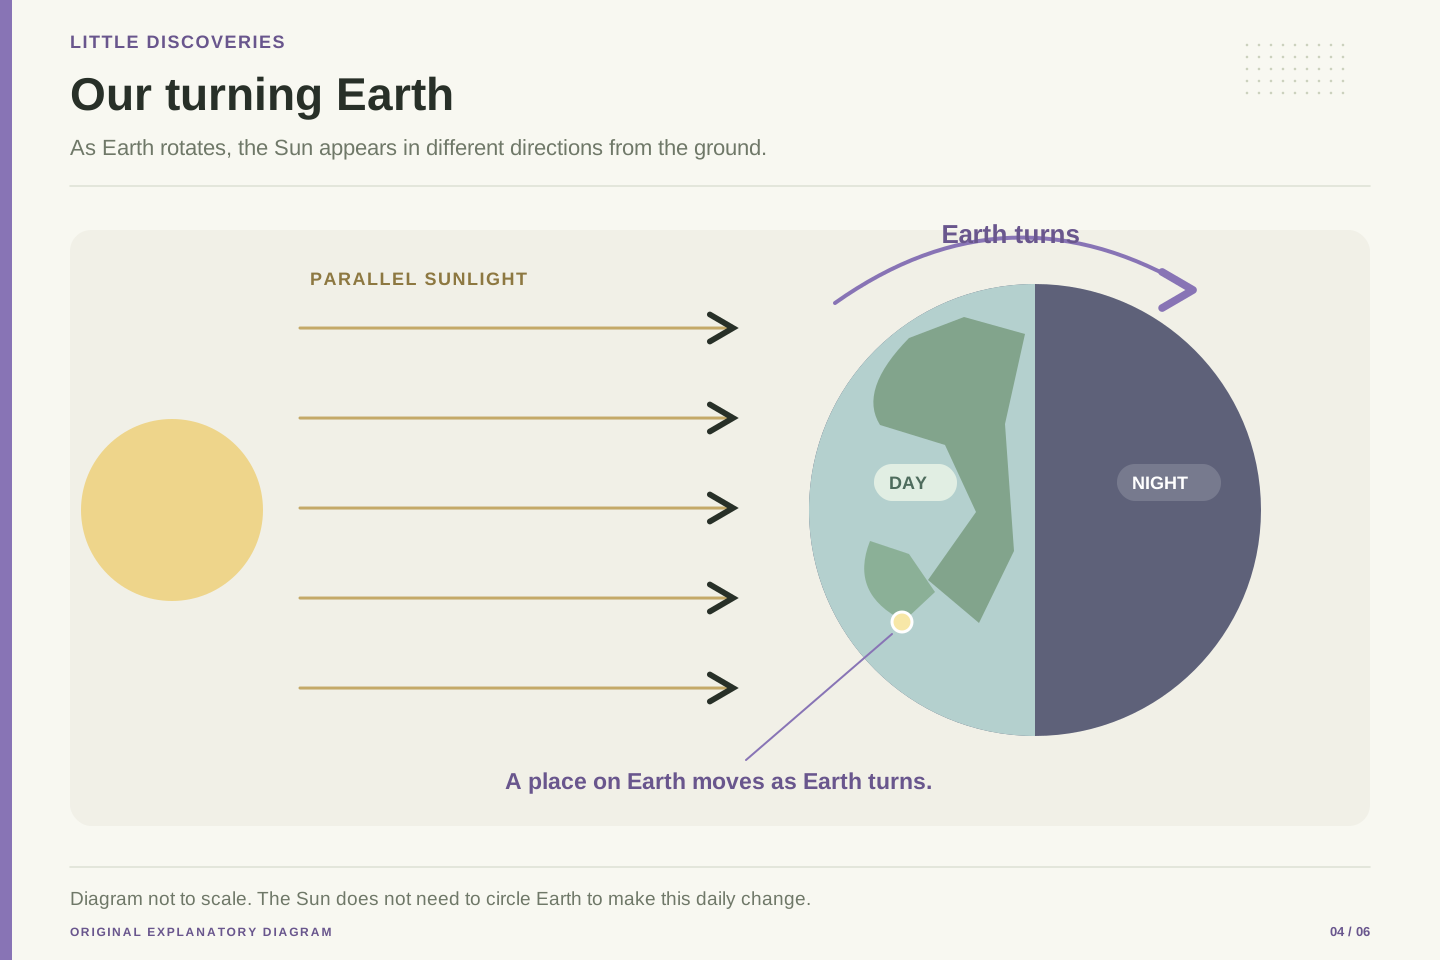
The Sun appears in different directions as the day passes. The daily pattern happens mainly because Earth turns. Your home, the ground and the object making the shadow turn with it. NASA describes Earth's rotation and its journey around the Sun as different motions. [2] The daily turning changes how sunlight reaches your local scene.
Imagine a small sticker on a ball. A grown-up can hold the ball while a torch shines from a fixed place. As the ball turns, the sticker moves into the light and later out of it. The torch does not have to travel around the ball to create that change. This model helps us think about day and night, although a small torch and ball are not a perfectly scaled Earth and Sun.
A shadow's direction and length can both change during the day. The shortest shadow for a fixed upright object on level ground is generally near local solar noon, when the Sun is highest that day. Solar noon is not always twelve o'clock on a wall clock. Do not assume every midday shadow points in the same compass direction around the world. Keep your observations local, write down the time, and look for the pattern your own measurements show.
Separate Earth's rotation from its orbital motion. Rotation produces the main daily change in the Sun's apparent direction for an observer on Earth's surface; the orbit and axial orientation contribute to seasonal changes. NASA's Earth facts describe both motions and the role of tilt in the seasonal pattern. [2]
A ball-and-torch model can demonstrate the change between an illuminated and unilluminated location while the source remains fixed. Mark one point on the ball and observe it as the ball rotates. Explain the model's limits: the torch is much closer relative to the ball than the Sun is relative to Earth, and its rays spread noticeably. It is a teaching model of orientation, not a scale model of the solar system.
For an outdoor observation, solar elevation and direction vary with location, date and time. Local solar noon is the time of the Sun's highest daily position; civil clock time also depends on the time zone and other conventions. A noon-direction rule learned in one hemisphere or latitude should not be treated as universal.
Record the date as well as the time if you repeat the experiment over several weeks. Otherwise you may mix a daily change with a seasonal one. The scientific task is to identify which variable changed, not simply to announce that all shadows always follow one fixed pattern everywhere.
Why some edges look sharp and others look soft
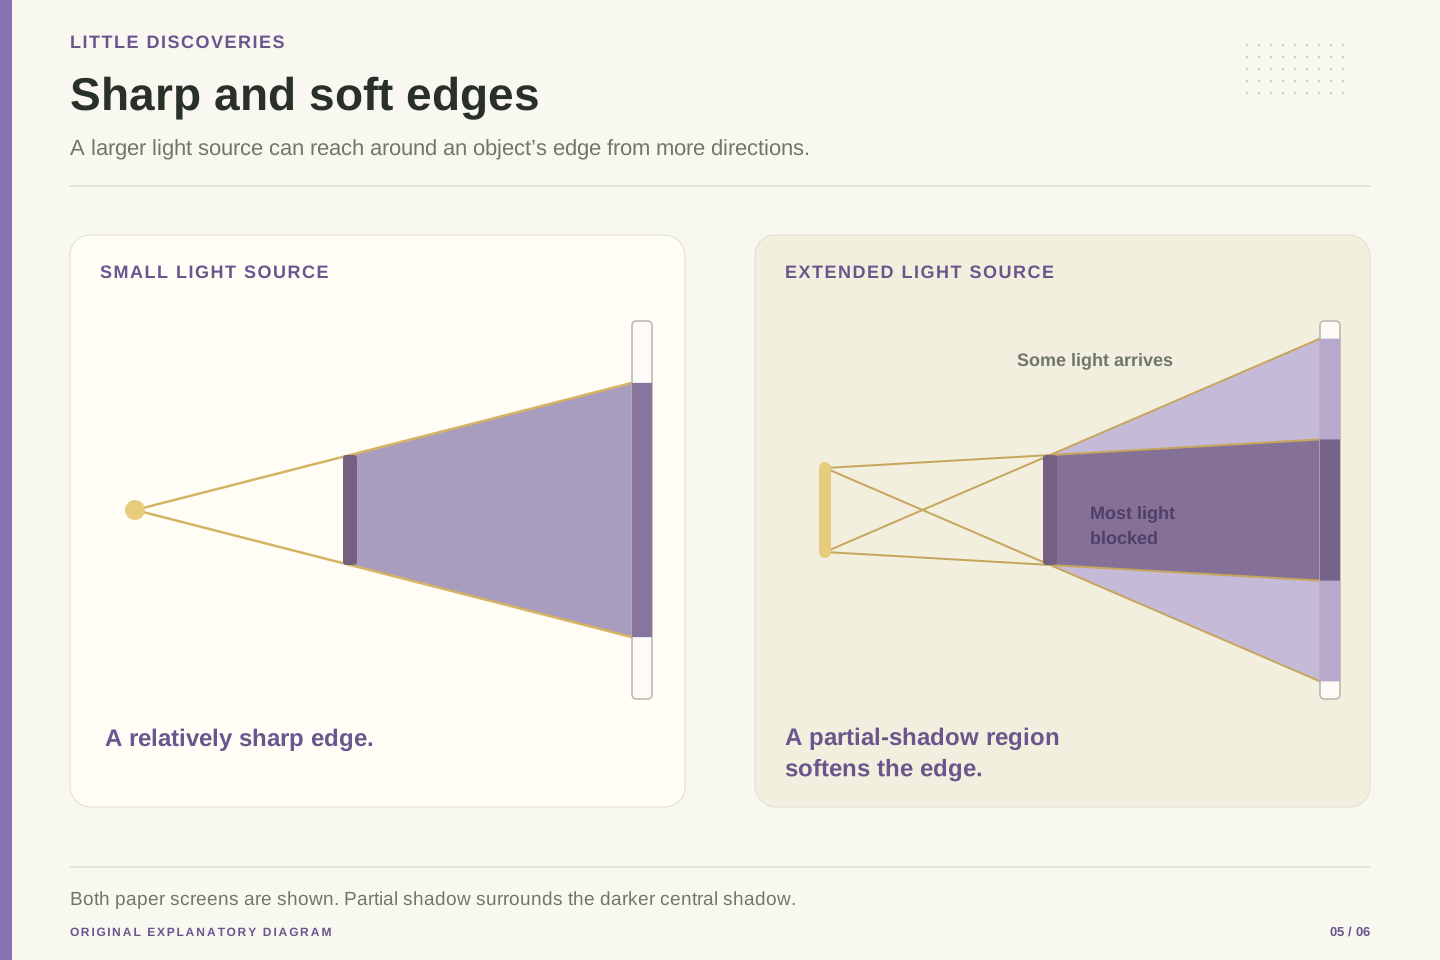
Look closely at the edge of a shadow on your paper. Is the change from light to dark sudden, or is there a soft grey border? A light source with noticeable size can send light toward the screen from several nearby positions. At some places the object blocks most or all of that source. At other places it blocks only part, so some light still arrives. The University of New South Wales explains these regions as full shadow and partial shadow. [4]
You can use ordinary words first: darker middle and softer edge. The science words are umbra for the full-shadow region and penumbra for the partial-shadow region. They describe how much of a particular source is blocked. Other light in the room may still brighten both regions, so full shadow does not always look completely black.
Try moving your object closer to the paper while keeping the torch steady. Observe the edge rather than only the size. Then return it to the earlier position. Draw what you notice, even if the change is small. Your torch may create a different pattern from a broad window or ceiling light. That difference gives you another question: how does the kind of light source affect the shadow?
An extended source has a finite angular size as seen from the object and screen. Different points on that source can be blocked along different paths. A region from which the source is fully obscured is an umbra; a region from which only part is obscured is a penumbra. UNSW's optics material illustrates this distinction. [4]
To understand it geometrically, draw rays from the upper and lower edges of the source past the object's edges. Their intersections with the screen mark changes in how much of the source is visible from each screen position. The ray diagram explains a gradual transition without treating the shadow as a solid object with its own material boundary.
For a classroom comparison, keep the object and screen fixed while an adult helps select two safe light sources with different apparent sizes. Do not assume that a brighter source is also a smaller source. Brightness and apparent size are different variables, and changing both complicates the explanation.
Ambient illumination adds another distinction. A region in full shadow from one torch may still receive light from a window or a reflecting wall. Describe full shadow relative to the source being studied. This prevents the misconception that an umbra must contain no light from anywhere. The model focuses on ordinary geometric shadows; it does not attempt to describe every wave effect at extremely small scales.
Can one object make two shadows?
It can, when light reaches it from different directions. Ask a grown-up to place two cool LED torches so they shine toward the same paper. Keep the object between them and the screen. Switch on one torch and find its shadow. Turn that torch off and switch on the other. The second shadow may appear in a different position. Now use both together and compare the pattern.
One torch can light part of the area that is in shadow from the other. That is why some parts look lighter and an overlapping part may look darker. The Exploratorium's colored-shadow activity uses the same broad idea with lights of different colors. [5] You do not need colored bulbs to begin; ordinary torches are enough to explore direction and overlap.
Make a prediction before switching a light off. Which shadow will change? Point to a place on the paper and explain which torch can reach it. This is a thinking game, not a speed game. Keep the torches aimed away from faces and leave room to move safely. If the pattern is confusing, return to one torch at a time. A simpler setup often makes a complicated observation easier to explain.
With multiple sources, illumination at a screen point depends on which sources have unobstructed paths to it. Blocking one source does not necessarily remove the light from another. Separate the contributions by switching sources on individually, then compare the combined arrangement. This is a simple form of controlled experimental decomposition.
The Exploratorium demonstrates that shadows can appear colored when different colored sources illuminate the same surface and an object blocks selected contributions. [5] For our initial investigation, two ordinary white LED sources are sufficient. The purpose is to understand source-specific blocking before adding color mixing as another variable.
Label the two sources A and B on a sketch. Choose three screen regions: one reached by both, one with A blocked, and one with both blocked. Predict their relative brightness under the idealized assumption that other illumination is small. Then observe. Source intensity, distance and reflections can affect the actual contrast, so describe the assumptions rather than expecting an exact brightness ratio.
This experiment also shows why saying an object has exactly one shadow is incomplete. The observed pattern depends on illumination, surfaces and viewpoint. Keep the account causal: the object changes light paths; the sources continue emitting light; the screen makes the differing illumination visible. No extra dark substance needs to travel from the object to explain the result.
Keep a notebook of the shadows you actually see
For an outdoor investigation, work with a grown-up in a safe place away from traffic and trip hazards. Choose a stable upright object on level ground, such as a small block. Look down at its shadow, not at the Sun. Mark the object's place so you can keep it in the same position. A few short observations are enough; you do not need to stand outside waiting between them.
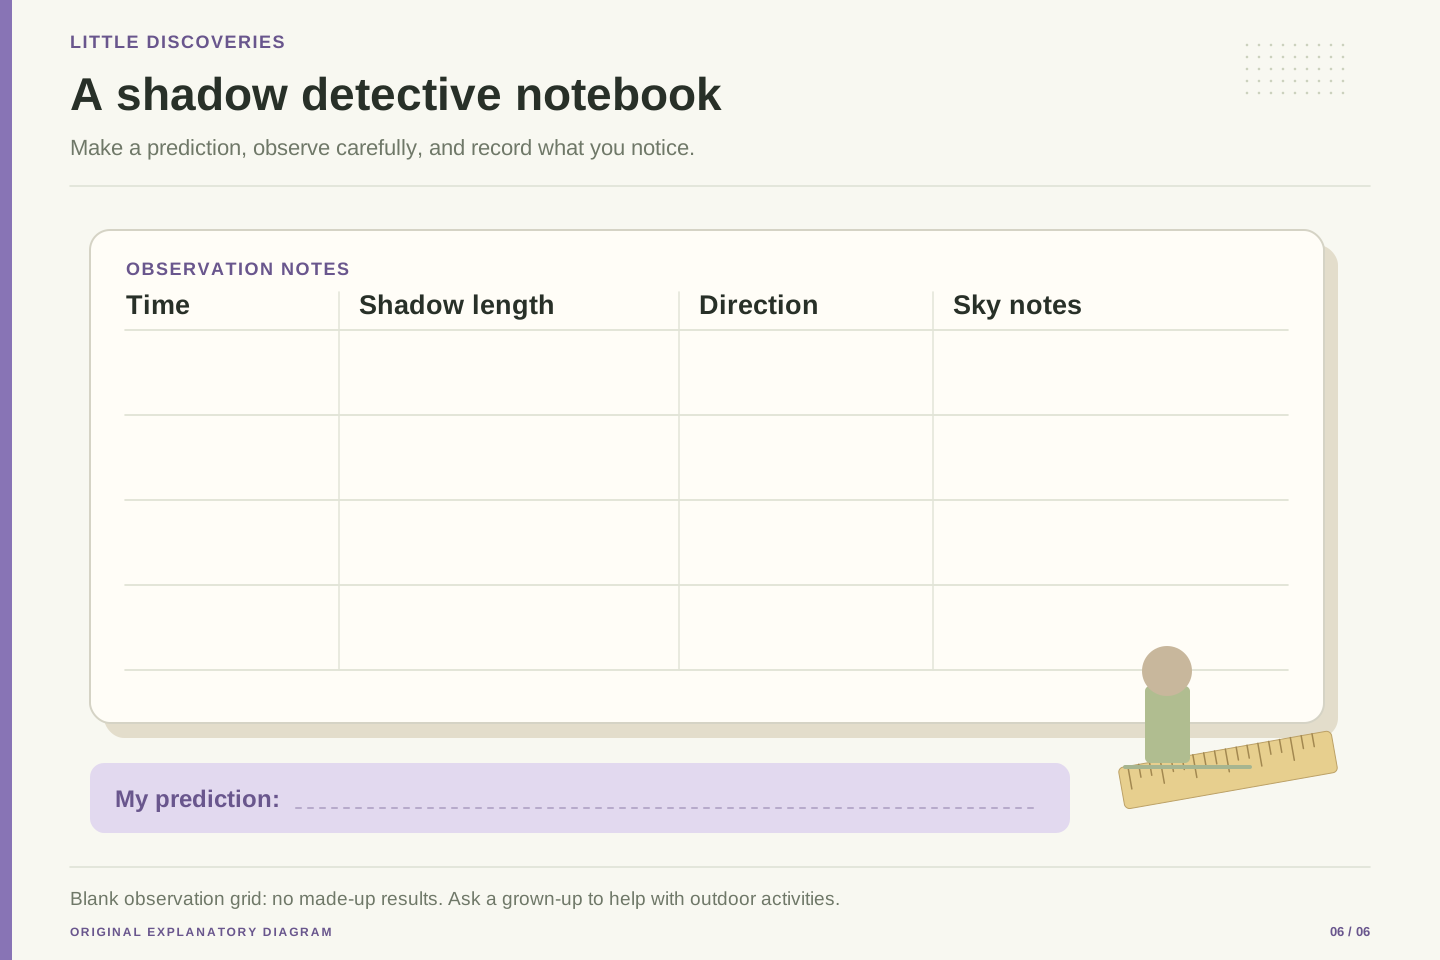
Make four notebook headings: time, shadow length, shadow direction, and sky notes. Measure from the object's base to the shadow's tip in the same way each time. If the edge is fuzzy, write that down. If a cloud arrives and the outline becomes difficult to see, record that too. Do not fill an empty space with a number you wish you had measured.
Before the next observation, draw your prediction in a separate box. Afterward, compare the prediction with your result. Did the shadow change direction, length, or both? Was anything moved accidentally? Your notebook should tell the story of what happened, including surprises. These observations belong to your experiment. The blank chart shown here does not contain hidden correct answers, and you never need to upload your name, location or photographs to enjoy the activity.
A useful observation record includes enough context to distinguish a pattern from an accidental change. Keep the object's position, height and orientation fixed. Record the date, clock time, measurement unit, surface condition and any cloud cover. A labelled sketch of direction can be useful without collecting or sharing a child's precise location.
Define the measurement before beginning. For example, measure from the base of the upright object to the farthest clearly identifiable point of its main shadow. A broad penumbra introduces uncertainty; describe a small range if one exact endpoint is not justified. Do not create extra precision by writing more decimal places than your ruler or shadow edge supports.
Separate observations from predictions. An observation says what was measured; a prediction says what the model leads you to expect next. Keeping both visible lets you investigate disagreement. If the object was moved, note the change instead of quietly combining incompatible measurements.
A simple graph can put time on the horizontal axis and length on the vertical axis. Use only actual measurements and leave gaps where no reading was possible. This is an original recording framework, not a dataset from an experiment performed for this article. It develops the habit of making claims that another person can inspect, while keeping children's names, images and location information out of the activity.
Three mysteries to solve with your new model
First mystery: a toy makes a larger shadow, but the toy has not changed. What might have moved? In the simple torch-and-screen setup, the toy may have moved closer to the source while the screen stayed still. Other changes can also affect the result, so ask about the whole arrangement before choosing an answer. Draw one arrangement that explains the observation.
Second mystery: a shadow becomes faint when another light is switched on. Has the object stopped blocking the first light? No. The new source may illuminate the same place from another direction. The original blocking still happens, but the screen now receives additional light. Switch the sources separately to test that explanation.
Third mystery: an outdoor shadow is shorter at the second observation. Did the person or object shrink? The direction of the sunlight may have changed while the object stayed the same. Check whether the object, surface and measurement method stayed fixed before deciding.
You now have a useful habit: name the source, find what blocks it, and look at the receiving surface. Make a prediction, change one thing, and describe the result. Shadows turn an ordinary wall or patch of ground into a small science investigation. You can stop after one section, return another day, and bring a new question to the same simple setup.
Use the model to distinguish competing explanations. A larger projected shadow could result from a changed source-object-screen geometry, but the observation alone does not identify which component moved. Request the missing information before drawing a conclusion. This is the same reasoning used in more complex scientific investigations: multiple causes can produce a similar visible effect.
For the faint-shadow puzzle, separate blocking from total illumination. The object can continue blocking source A while source B fills the region with light. Turning sources on individually tests that explanation without changing the object's position. The experiment is stronger when it changes one relevant condition rather than several at once.
For the outdoor-length puzzle, check the fixed assumptions of the geometric model: vertical object, level surface and a consistently defined endpoint. A changed light direction can explain the length difference, but an accidentally tilted block could also contribute. Good scientific language says what the evidence supports and what remains uncertain.
Finally, explain the model to someone else using your own sketch. Include one case it handles well and one limitation, such as a fuzzy edge or a nearby broad source. You have learned more than vocabulary about umbras and penumbras. You have practiced building a small explanation, testing it safely, preserving observations and improving the explanation when the world turns out to be more detailed than the first drawing.
Sources & further reading
Explore the references behind this guide. External pages may change after our review.
- Light travelling in straight linesInstitute of Physics, IOPSpark · Accessed 6 Nov 2026
- Facts About Earth: orbit and rotationNASA Science · Accessed 6 Nov 2026
- Tropical Solstice ShadowsNASA Science / Night Sky Network · Accessed 6 Nov 2026
- Geometrical Optics Laboratory: shadowsUniversity of New South Wales, School of Physics · Accessed 6 Nov 2026
- Colored ShadowsExploratorium Teacher Institute · Accessed 6 Nov 2026
- Eclipse Viewing SafetyNASA Science · Accessed 6 Nov 2026
- The Ray Aspect of LightOpenStax, Rice University · Accessed 6 Nov 2026
Article updated 6 Nov 2026.