What you’ll take away
- A botanical fruit develops from a flower’s ovary, sometimes with other floral tissue.
- Pollination, fertilisation, fruit development and germination are different events.
- Fruit structure and seed location vary: the tomato, pea pod and strawberry make useful comparisons.
- Use diagrams or an adult-led observation activity; no tasting or collecting wild seeds is needed.
Before the fruit bowl, there was a flower
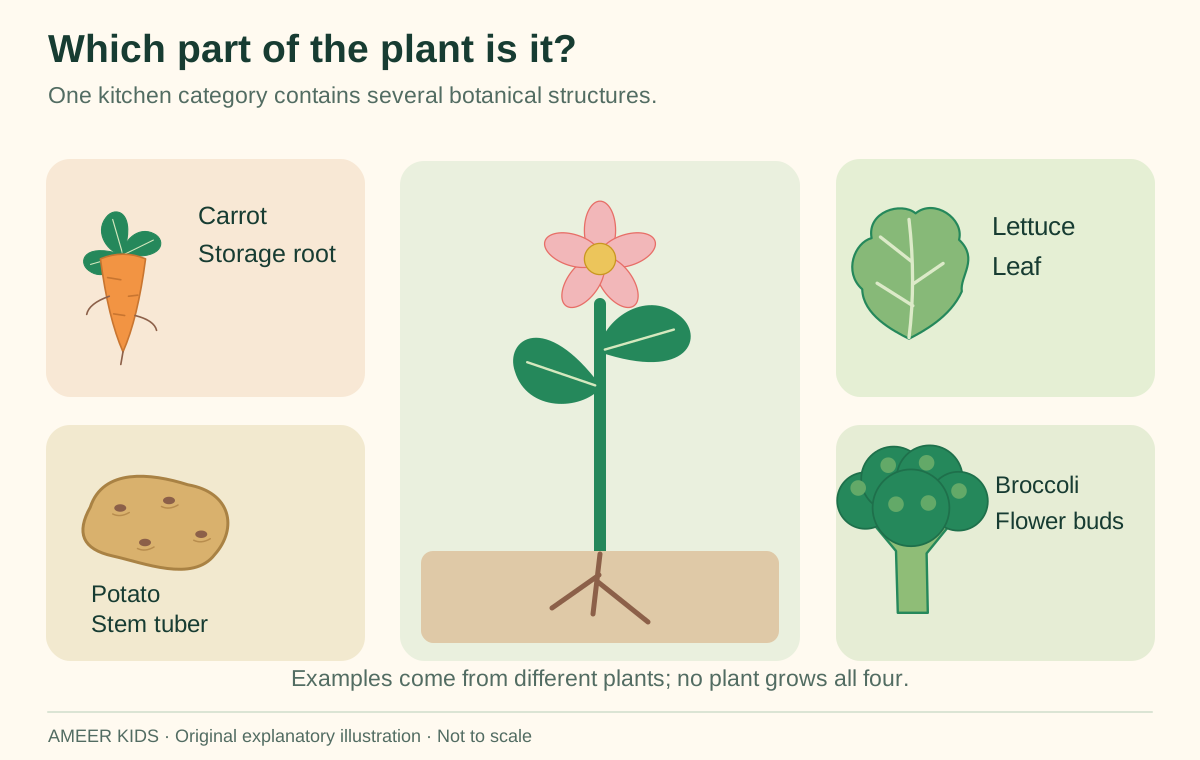
A tomato has a story that begins before it is red, before it reaches a shop, and even before it looks like a tiny tomato. It began as part of a flower. Botanists, the scientists who study plants, call the seed-bearing structure that develops from a flower's ovary a fruit. Other flower parts can also help make some fruits. That is why tomatoes and cucumbers belong in a botany lesson about fruit, even when a cook calls them vegetables. [1,3]
Imagine two sorting tables. The first asks, “Where would we use this in a meal?” The second asks, “Which part of a plant grew into this?” A tomato can go beside lettuce on the first table and beside a peach on the second. The questions are different, so the groups can be different too. You do not need to choose one meaning and throw away the other.
For this adventure, use the pictures on the page. No tasting, picking wild plants, or opening hard seeds is needed. If a grown-up chooses to show you a real cut fruit, let them do all the cutting. Your job is to notice shapes and ask questions. Start with one: where would you draw the flower in the tomato's earlier life?
Botanical classification follows the origin of an organ. In flowering plants, a fruit develops from an ovary, sometimes together with additional floral tissues. This differs from the culinary category “fruit,” which usually reflects customary use. Tomato and cucumber illustrate the distinction particularly well: their kitchen roles do not change their reproductive anatomy. The useful question is developmental: what structure did this object arise from? [1,3]
Try drawing two overlapping circles on paper. Label one “culinary vegetables” and the other “botanical fruits.” Put a tomato drawing in the overlap. Place a lettuce leaf outside the botanical-fruit circle. This is an original classification exercise, not a claim that every food has one universal cultural label. A good classification states its rule before placing examples.
This reading mode is for curious older children and adults sharing the article. Technical words will name structures precisely, while the activities remain observation and paper work. The illustrations are simplified models, not identification keys for unknown plants. Never use a resemblance to a diagram as a reason to taste a wild berry or seed. If real produce is included, a responsible adult selects it and handles knives; a photograph is sufficient for every question here. We are studying how a plant grows, not deciding what someone should eat.
A flower contains more than petals
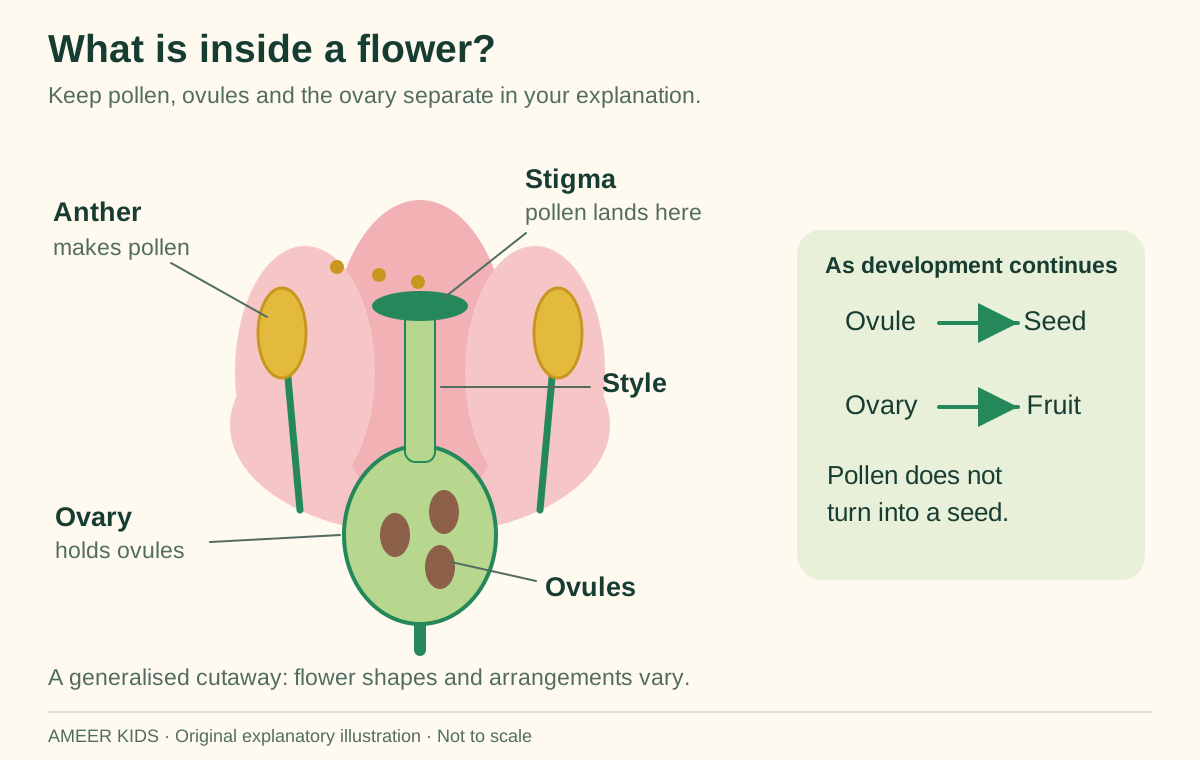
Petals may catch your eye first, but look at the centre of the flower diagram. The anthers make pollen. The stigma is a place where suitable pollen can land. A narrow part called the style leads towards the ovary. Inside the ovary are tiny structures called ovules. After the right events happen, an ovule can develop into a seed. The pollen itself does not turn into a seed. [3,10]
Use your finger to follow the diagram, or ask a reading partner to describe its arrows. Say the names slowly: anther, stigma, ovary, ovule. Notice that “ovary” and “ovule” sound similar but name different things. The ovary contains ovules, just as a drawn room can contain several drawn chairs. That comparison helps with the idea of inside and outside; a real flower is alive and far more interesting than a room.
Now make a pretend museum label with three sentences. “This is the flower.” “This part holds the ovules.” “The ovules can become seeds.” Leave a question mark beside anything you cannot identify. Scientists do not need to pretend they can see every tiny part. On a real flower some structures may be hidden, and different kinds of flowers can look very different.
A typical flower diagram shows stamens, each with an anther on a filament, around a carpel or group of carpels. A carpel includes a pollen-receptive stigma, a style, and an ovary containing ovules. The anther produces pollen grains; the ovule contains the structures involved in producing the egg and supporting the future seed. These labels describe relationships, not a promise that every flower has the same visible arrangement. [3,10]
The distinction between an ovule and an ovary is especially useful when interpreting a cross-section. A boundary drawn around several ovules represents a containing organ. Enlarging that whole outline and enlarging each object inside it are different developmental changes. Colour the ovary outline green and the ovules brown in a paper copy of your own sketch. Keep those colours when drawing the later fruit and seeds. The repeated colours represent continuity through time, rather than an exact prediction of real fruit colours.
A diagram can show a structure that a photograph conceals. That makes diagrams useful, but it also places responsibility on the reader: check the labels instead of treating every line as something visible to the naked eye. Our flower illustration is a generalised teaching model. It is not a microscopic image, a species-specific dissection, or a scale drawing. Its purpose is to keep pollen, ovules and the ovary from becoming one vague “seed-making bit.”
Pollen starts a journey; a seed comes later
Pollination means pollen reaching a suitable stigma. Sometimes an insect carries it. Sometimes wind helps. Pollen may come from the same plant or a different plant of the same species. After suitable pollen lands, a pollen tube can grow towards an ovule. Cells travel through that tube, and fertilisation can begin the development of an embryo, the tiny new plant inside a seed. Pollination and fertilisation are connected steps, but they are not the same step. [2,10]
Act this out using only drawings. One person points to the anther. Another follows an arrow to the stigma. Next, trace the tube down towards an ovule. Finally, turn over a paper card to reveal a seed drawing. The turned card stands for a change over time, not an instant trick. Put a small clock symbol between the pictures to remind yourself that growth takes time.
Not every blossom produces a fruit. A cucumber plant often has separate pollen-producing and fruit-producing flowers. The pollen-producing flowers do not have the ovary that grows into a cucumber. Some cucumber varieties can even make seedless fruit without pollination. These are useful reminders to say “often” or “usually” when nature has more than one way to do something. [5]
Pollination is transfer of pollen to a receptive stigma. Fertilisation occurs later, after a compatible pollen grain germinates and its pollen tube reaches an ovule. Flowering plants typically undergo double fertilisation: one sperm cell joins the egg to initiate the embryo, while another contributes to the tissue that supports its development. These cellular events explain why depositing pollen and producing a viable seed are not interchangeable observations. [2,10]
Build a paper flow chart with separate boxes for transfer, tube growth, fertilisation and seed development. Use arrows labelled “can lead to” rather than “always causes.” Then ask what evidence would identify each stage. Seeing an insect on a flower establishes a visit; it does not by itself establish successful pollen transfer. Seeing a fruit later is another observation, but it still does not show every hidden cellular event. The chart helps separate an observation from an explanation inferred from biology.
Cucumbers provide a useful exception test. Many cultivars bear separate staminate and pistillate flowers; the latter have the ovary that develops into the cucumber. Some cultivars are parthenocarpic, meaning fruit can develop without fertilisation, often with few or no mature seeds. A claim that every fruit must contain a visible seed would fail this example. Species and cultivar details matter when applying a general life-cycle model to an actual garden. [5]
How does a tiny fruit get bigger?
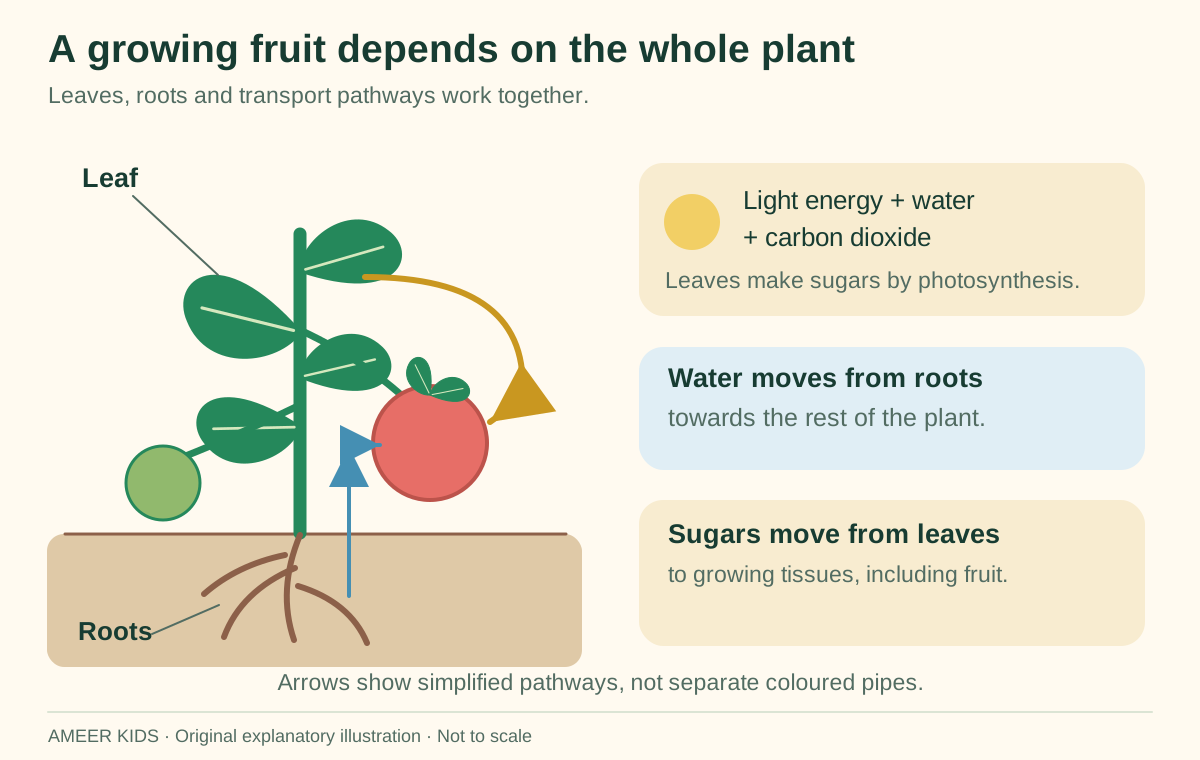
Once a young fruit starts developing, it is still part of a working plant. Leaves use light energy, water and carbon dioxide from the air to make sugars. This is photosynthesis. The plant moves sugars to places where they are needed, including growing fruits. Roots take in water and minerals. A fruit does not fill itself by eating little pieces of soil. [4]
Think about a drawing of a tomato plant with a small green fruit and a larger fruit. Draw one arrow from a leaf towards each fruit and label it “materials for growth.” Draw a different arrow from the roots up the stem and label it “water.” These arrows describe connections. They do not mean the inside of the plant contains coloured pipes like the ones you drew.
If you can observe a known garden plant with a grown-up, choose one fruit that can be seen without touching it. Make a drawing on two or three different days. Keep the viewpoint similar. Describe what you actually notice: a wider outline, a different colour, or no obvious change. Do not write “twice as big” unless you have a fair way to measure it. A careful “I cannot tell yet” is a useful result too.
Fruit growth depends on resources moving through the whole plant. Photosynthesis captures light energy in carbohydrates using carbon dioxide and water. Developing fruits act as sinks for transported photosynthetic products, while roots supply water and mineral nutrients. Growth involves producing and expanding living tissue; it is not simply the addition of soil to a pre-existing container. These connections are why a fruit diagram needs a leaf and a root system somewhere in the wider explanation. [4]
Design an observation series that separates three variables: apparent size, colour and position. A photograph taken closer to a fruit can make it appear larger without biological growth. For a paper investigation, choose a fixed viewpoint and record dates beside sketches. If an adult can place a ruler safely beside an accessible known fruit without damaging the plant, record a clearly defined dimension. Otherwise use descriptive observations and avoid numerical claims.
The inference should match the measurement. An increase in visible width supports a statement about that dimension; it does not directly measure mass, sugar content or seed maturity. A colour change is a separate observation. This is a useful lesson in scientific restraint: several processes can occur together, yet one measurement does not stand in for all of them. The exercise is an invitation to observe a local plant, not a report that our editorial team has grown or tested a particular tomato variety.
Fruit comes in surprising packages
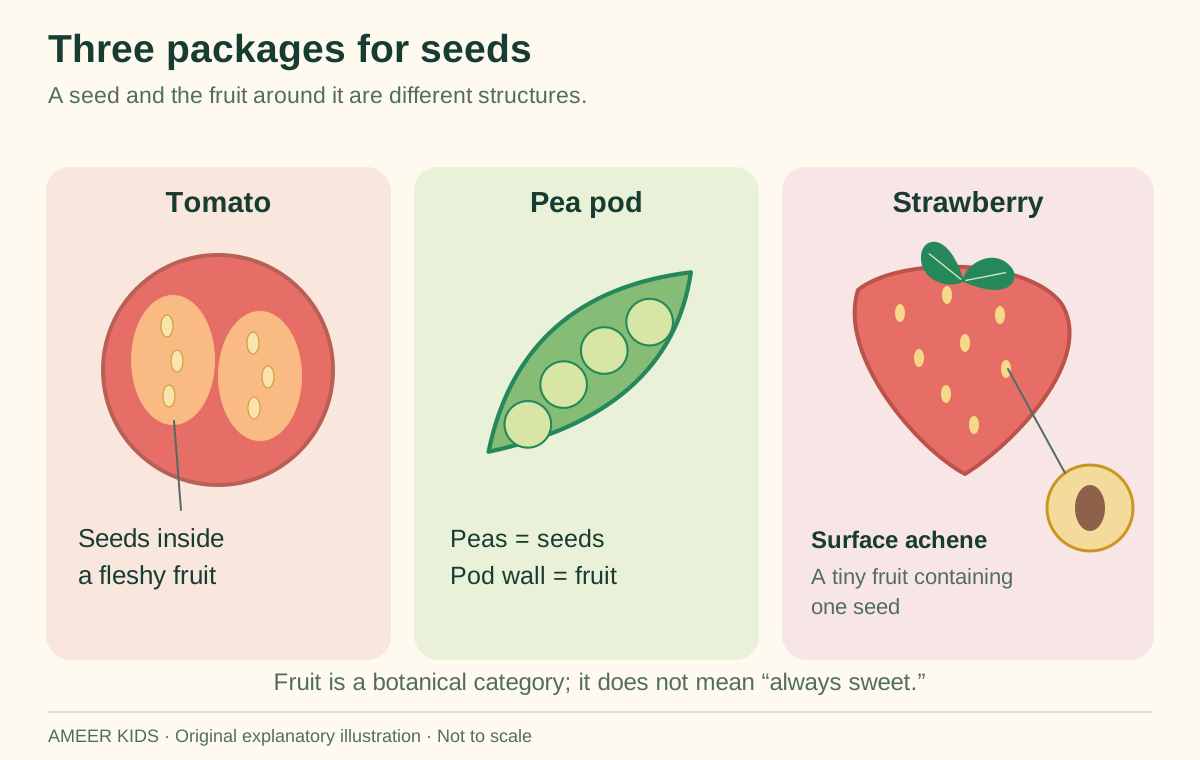
A fruit can be soft, dry, large, tiny, sweet, or not sweet at all. A tomato has many seeds inside its fleshy fruit. A pea pod is also a fruit, with the peas as seeds inside. A winged maple fruit carries its seed in a very different package. The word “fruit” tells you about how the structure developed, not whether it belongs in a pudding. [1,3]
Strawberries add a surprise. The little dots on the outside are small fruits called achenes; each normally contains a seed. The red part grows mainly from another flower structure called the receptacle. This is why a strawberry is called an accessory fruit. You do not have to memorise that long name to enjoy the important idea: different flower parts can help make the object we call a fruit. [6]
Look at the three packages in the illustration: a fleshy fruit, a pod and a strawberry. Ask the same questions about each picture. Where are the seeds? What surrounds them? Which parts would you need to label more carefully? Use a pencil to circle the part you are unsure about. Comparing three examples is more useful than deciding that the first fruit you meet is the pattern for all the others.
Fruit classification depends on developmental anatomy as well as texture. A pea pod is the fruit wall around several seeds; the peas are not miniature fruits. A tomato is a fleshy fruit containing seed-bearing chambers. A maple samara is a dry winged fruit. These examples show why sweetness, juiciness and size are unreliable botanical tests. They are properties that can vary among structures with the same broad reproductive role. [1,3]
Strawberry anatomy adds another level. Each surface achene develops from an ovary and encloses a seed, while the conspicuous fleshy receptacle forms the accessory tissue. The familiar whole strawberry therefore combines many small fruits with a swollen supporting structure. A drawing that labels every surface dot simply “seed” misses a useful distinction between a seed and the fruit surrounding it. [6]
Make a comparison matrix on paper with columns for “structure called fruit,” “location of seed” and “other tissue shown.” Use three drawings rather than real specimens. The exercise rewards precise labels more than large vocabulary. If a label would require knowledge beyond the image, write “needs another view.” For instance, the outside of a closed pod does not reveal how many mature seeds it contains. A cutaway is a model of the hidden arrangement, not evidence that every pod has exactly the number of peas the artist chose to draw.
Seeds can travel without legs
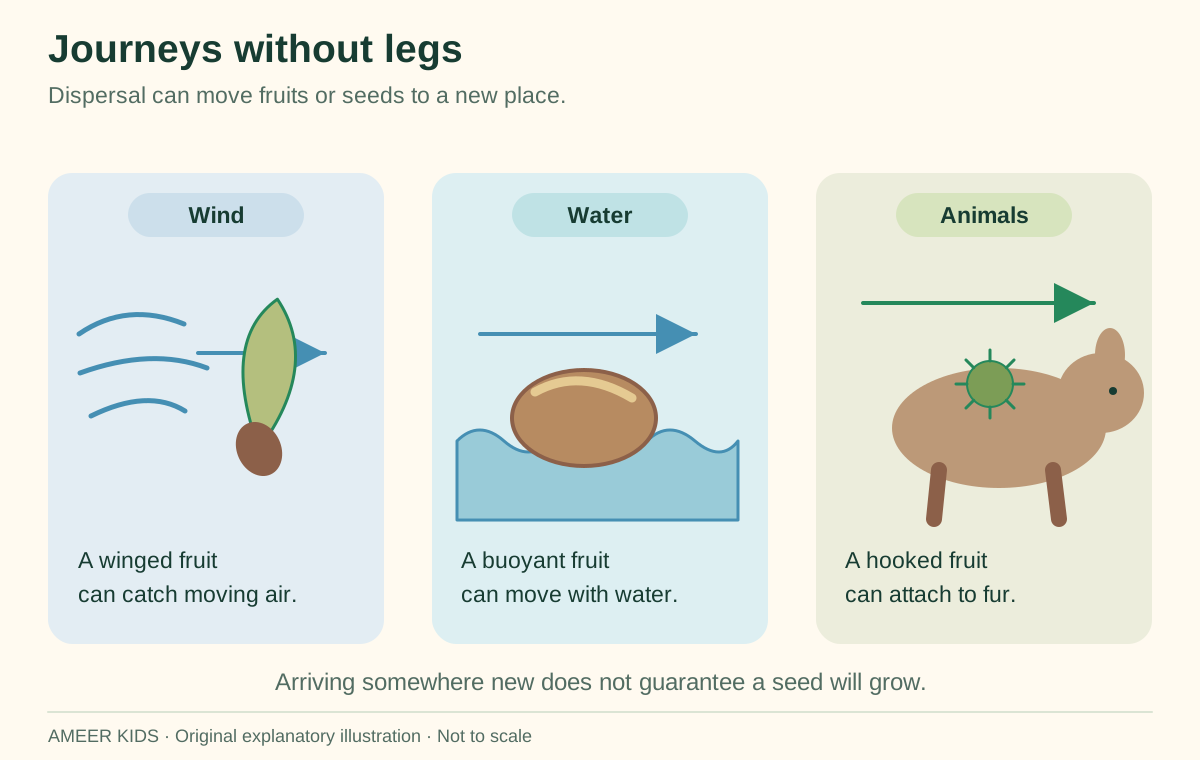
A parent plant usually stays rooted in one place, but its seeds may travel. Wind can move some light fruits and seeds. Water can carry others. Animals may carry hooked fruits on their fur, move fruits in their mouths, or pass some swallowed seeds in their droppings. These different journeys are called dispersal. They can move seeds to places where a new plant may have room to grow. [7]
Our picture shows three possible journeys. Follow each arrow and describe the helper: air, water, or an animal. The arrows show routes, not guaranteed destinations. A seed might land somewhere too dry, too shady, or otherwise unsuitable. Getting away from a parent plant is one event; growing successfully in the new place is another.
Try a paper design challenge with a grown-up. Draw an imaginary seed package meant to catch moving air. Give it a wide paper wing and explain what you hope the wing will do. Then draw a package meant to attach gently to an imaginary animal's coat. Do not attach anything to a real animal. These designs are models for asking questions, not proof that your invented plant could live in the wild. Never release real seeds outdoors as part of this game.
Dispersal moves seeds away from their point of production. The moving unit may be a bare seed, a fruit containing a seed, or a larger structure. Wind, water and animals provide distinct transport pathways, and some plants release seeds through their own mechanical structures. The route changes the chance of arriving at a suitable site; it does not guarantee establishment. A successful journey must still be followed by survival and germination. [7]
For a modelling exercise, specify what you are trying to investigate before designing a paper carrier. A question such as “Does a wider wing change how this paper model falls?” is more testable than “Which seed is best?” Keep paper type and release height similar, have an adult choose a clear indoor space, and compare repeated releases. Do not climb or drop objects from windows. Record a result as a property of the paper models under those conditions, rather than a universal rule about living species.
You can also analyse a model without dropping anything. Mark the part that would provide drag, buoyancy or attachment, then explain what the drawing leaves out. It does not include a living embryo, changing weather, competition or damage during travel. Identifying these omissions makes a model more useful. It tells a reader which question the model can address and which questions require observations of real plants or more detailed evidence.
What wakes a seed into growth?
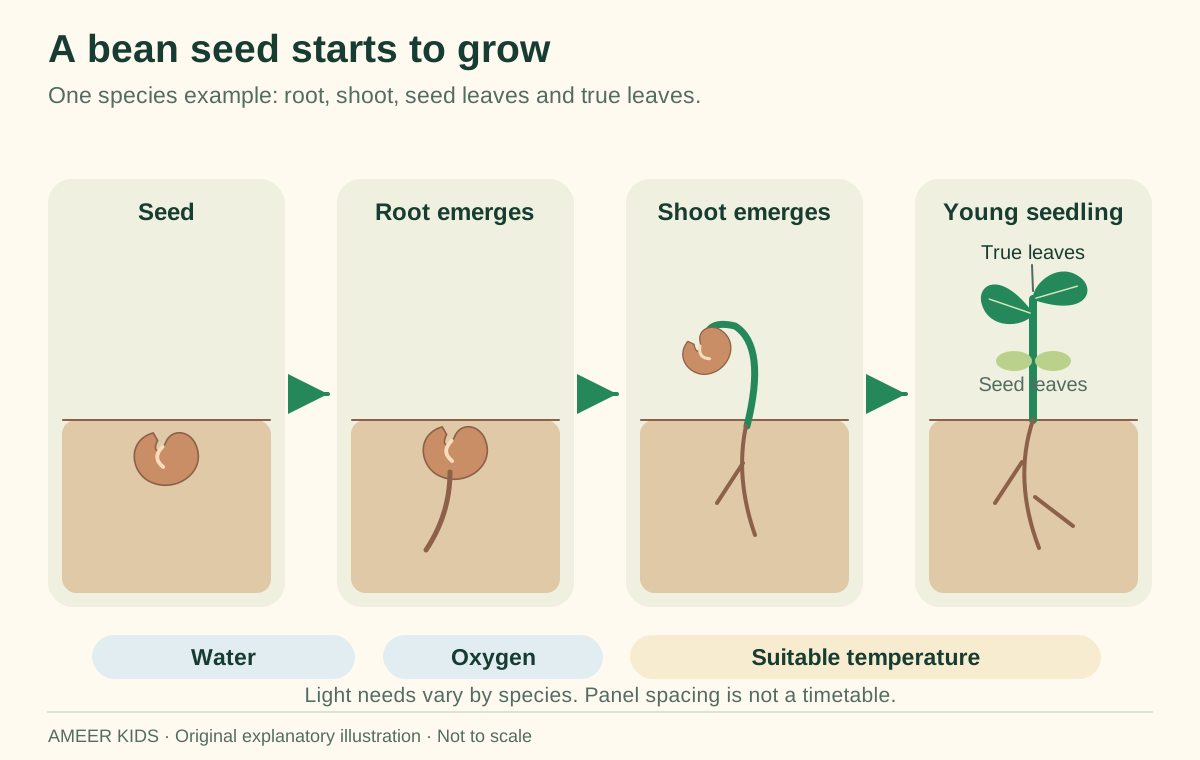
Inside a seed is an embryo, with protection around it and stored resources to help early growth. Germination is the start of that growth. Seeds need suitable conditions, including water, oxygen and an appropriate temperature. Some kinds also need a particular light condition or a waiting period. A rule that says “every seed needs bright sunlight to sprout” would be too simple. [1,8]
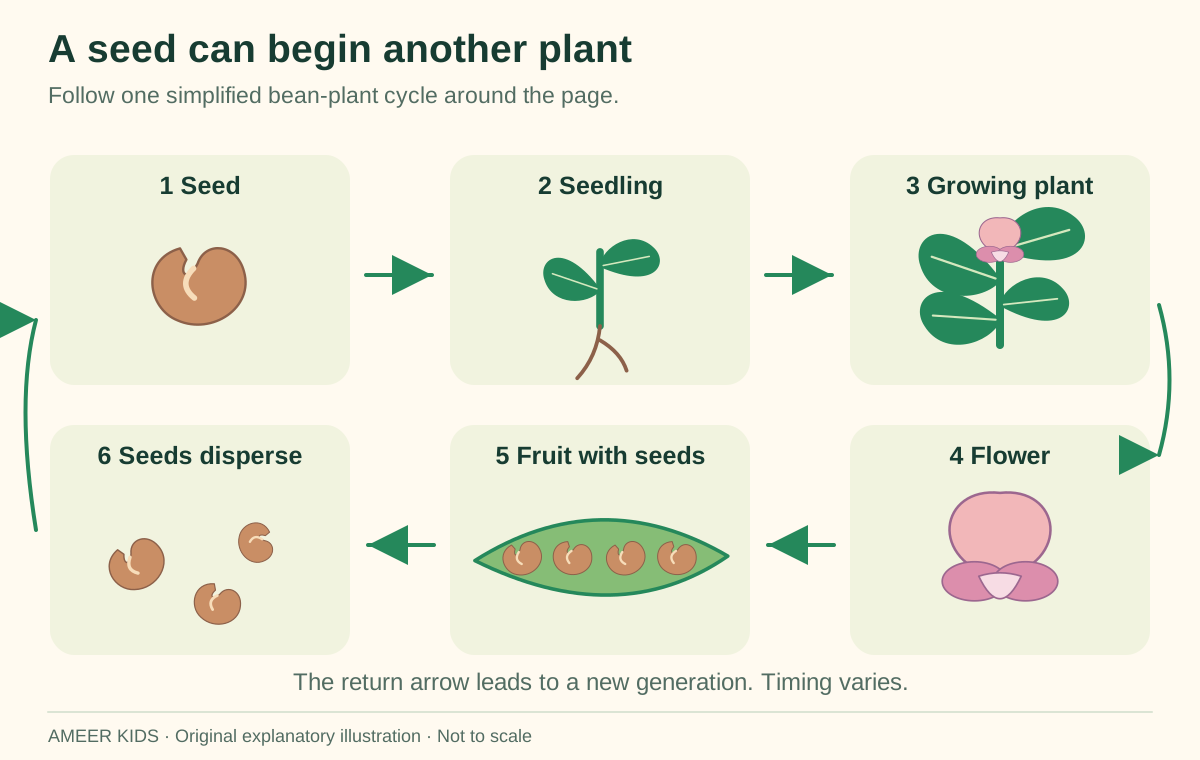
Follow the bean example in the drawing. A small root appears, then the young shoot grows and leaves open. This is one example, not a timetable for every seed. Look for the difference between the first stored seed leaves and the later leaves. You can trace the changing outline without touching any real seeds.
If you and a grown-up decide to grow a plant, let the adult choose an appropriate seed and follow its packet directions. Small seeds should stay with the adult and away from mouths and younger children. Use a paper diary to record what appears. There is no need to send a name, photograph or home location to this site. If nothing sprouts by the expected time, record that honestly. A seed might not be alive, or its conditions might not have been suitable.
Germination begins with renewed growth of the embryo. Water uptake is an early event, but water alone is insufficient: oxygen and a suitable temperature are also required, and light responses vary by species. Dormancy can prevent an otherwise living seed from germinating until additional requirements are met. Germination and the later light needs of a leafy seedling are related but separate questions. [1,8]
The common-bean sequence is a deliberately specific model. It shows emergence of the primary root and development of a shoot with cotyledons and later foliage leaves. Do not turn the panel spacing into a claim about hours or days. The illustrations have no calibrated time axis. Their purpose is to preserve the order and identity of the main visible structures while leaving species-dependent timing to a suitable growing guide.
An adult-led observational project can use a seed packet as its starting protocol. Record the species or variety on paper, sowing date, stated instructions and the first visible change. Distinguish “no emergence observed” from “the seed is definitely dead.” The first is a report; the second needs more evidence. Use the project to practise careful language and patience. There is no reason to collect personal information or publish a child's observations online for this learning activity, and the original illustrations offer a complete alternative when handling seeds is unsuitable.
A life cycle is a sequence, not a countdown
A life-cycle picture often ends where it began: with a seed. That does not mean every plant takes the same amount of time. Annual plants can complete a seed-to-seed cycle in one growing season. Biennial plants usually spread that cycle over two seasons, and perennial plants live for more than two years. A tree and a small garden plant do not follow the same calendar simply because both make seeds. [9]
Make six large paper cards: seed, seedling, growing plant, flower, fruit, and seeds ready for a new journey. Arrange them in a circle. Now point to the card where you would expect to see a flower, and the card where you would look for new seeds. The drawing connects stages; it does not say that the old plant turns into one seed and disappears.
There are other ways plants make new plants too. Strawberry runners can grow away from the parent and form daughter plants. That route does not begin with a new seed. [11] Add a side path to your paper story if you want an extra challenge. A useful science diagram can show a common route clearly while still leaving space for an exception.
A life cycle describes recurring developmental stages, whereas a time series records their duration. Annual, biennial and perennial are useful life-history categories, but the timing of flowering and fruiting also depends on species and conditions. A circular classroom diagram should not imply that every plant completes its cycle in the same season, or that the mature individual necessarily dies as soon as one fruit forms. [9]
Redraw the cycle as a branching sequence. Put the mature plant in one box and connect it to flowers, fruits and a new seed-derived individual. Keep the original plant visible where that is appropriate for the example. This small change prevents a common visual mistake: treating reproduction as the disappearance of a parent and its replacement by a single offspring. Use a dashed arrow for a pathway that you are discussing but not observing.
Strawberry provides a concrete additional pathway. Its stolons, commonly called runners, can root and produce daughter plants. This is vegetative reproduction and is distinct from the seed pathway. [11] Compare the evidence you would need to recognise each: a fruit and seed sequence for one route, a physical runner connection for the other. The exercise builds a habit that transfers beyond botany: when a diagram has one path, ask whether it is the only possible path or simply the path chosen for the lesson.
Tell the story using evidence
You now have the pieces for a small plant museum on paper. Choose a tomato, a pea pod, or a strawberry from our illustrations. Draw its earlier flower, its fruit stage and the place where its seeds belong. Add one sentence under each drawing. For a tomato you might write, “This part grew from the flower's ovary.” For a strawberry you might write, “The little surface fruits each hold a seed.” Check the earlier diagrams if you need help.
Invite a reading partner to ask three questions. Which detail did you see in the illustration? Which detail did you learn from the explanation? Which question would need a different picture or more observation? You can use three pencil marks to keep those answers separate. There is no score for finishing quickly. A clear explanation with one honest question is better than a crowded page of guesses.
Finish by returning to the fruit bowl in your imagination. A fruit is now more than a colour or a flavour: it has a place in a plant's story. You can follow that story from a flower to a seed and towards another growing plant. Next time you see a familiar fruit with a grown-up, notice one new detail and tell them why it caught your attention.
A useful final product is a claim-evidence-explanation card. Make one claim about a pictured fruit, name the feature that supports it, and explain the biological relationship. For a pea pod, the claim might identify the pod as the fruit and the peas as seeds. The evidence comes from the labelled developmental diagram; the explanation links the containing structure to the flower's ovary. Do not present the exercise as a dissection you performed if you only studied an illustration.
Add a limitations sentence. A diagram may omit cultivar differences, immature structures, scale or tissue detail. Stating a limitation is not a failure of understanding. It shows you know what kind of evidence you used. An ambitious learner can compare two sources in the reference list with an adult, asking whether they discuss the same species and use the same meaning of “fruit.” Apparent disagreements sometimes come from comparing a kitchen category with a botanical one.
The goal is a connected explanation: flowers contain reproductive structures; suitable processes can produce seeds; fruits develop around or with those structures; dispersal and germination create possibilities for new plants. Keep exceptions attached to that explanation rather than memorising them as unrelated trivia. A successful learning page lets you answer a new question, identify what remains uncertain, and choose the next observation that would help. Your paper work can stay entirely at home.
Sources & further reading
Explore the references behind this guide. External pages may change after our review.
- Reproductive plant partsOregon State University Extension · Accessed 6 Nov 2026
- Pollination and Fertilization — Biology 2eOpenStax, Rice University · Accessed 6 Nov 2026
- Angiosperms — Biology 2eOpenStax, Rice University · Accessed 6 Nov 2026
- Plant growth and developmentOregon State University Extension · Accessed 6 Nov 2026
- Growing cucumbers in home gardensUniversity of Minnesota Extension · Accessed 6 Nov 2026
- Strawberry — Fragaria × ananassaNorth Carolina State University Extension · Accessed 6 Nov 2026
- Plant Fossils — flowering plants and seed dispersalUnited States National Park Service · Accessed 6 Nov 2026
- Starting seeds indoorsUniversity of Minnesota Extension · Accessed 6 Nov 2026
- Know the life cycles of plants — annuals, biennials and perennialsOregon State University Extension · Accessed 6 Nov 2026
- Reproductive Development and Structure — Biology 2eOpenStax, Rice University · Accessed 6 Nov 2026
- How strawberry plants growUniversity of Minnesota Extension · Accessed 6 Nov 2026
Article updated 6 Nov 2026.